Actually this tutorial is very easy to do. You only need photoshop, here is how to do it:

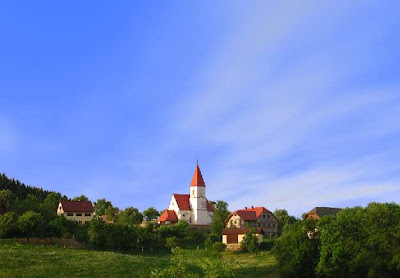
Open your photoshop and import the photo you want to change its background, for example I will change the sky of this photo, and replace it with another "sky".

ganti background

First create a selection to the area you want to remove. You can use quick selection tool (W) to perform this.

ganti background

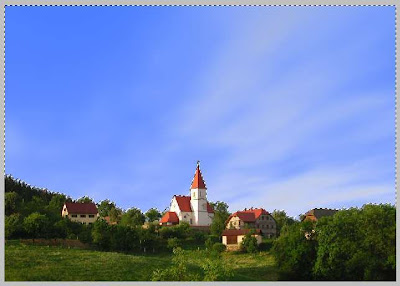
To make the outer of selection area smooth, you can use feather (Shift + F6) and set it to 5px.
After that press M to make the selection movable.
Open another "sky" photo and put it beside the first photo. Drag the selection to second photo.

ganti background

ganti background

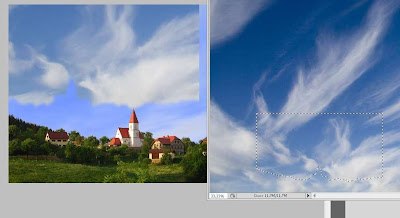
By using move tool (V), drag the selection back to the first photo. The sky from second photo will be cropped to the first photo.

ganti background

The final step, move the sky that we cropped before to match exactly with the first photo. Background is successfully replaced... :D

Tips:
- Make sure the color tone of both photo is equal or same. Otherwise, the photo won't look natural.
There's so many software out there that we can use to create a slideshow. Even some of them provide an automatic feature to create slideshow, just drop photos and background music then the slideshow is created. Now I will show you how to create a photo slideshow using corel video studio x2.

By manual create photo slideshow, you can get a better slideshow because it's more structured then automatic one that use random transition and random style. Plus you can build the "mood" of photo slideshow itself.

At first import the image sequences to corel workspace. Usually still image had a duration to 3 seconds by default. You can set it later.
It's better that you edit the photo first before import it to corel. You can crop, adjust brightness/contrast, etc to beautify the photo.

membuat slideshow

After that, you can add background music to it, right click insert audio - to music track.

buat slideshow corel

Add pan and zoom effect to every photo, drag pan and zoom effect from preset menu. You can also add more effect to make your slide more dynamic. You can customize the effect one by one if the default style not suitable for your photos.

slideshow making

Now we goto transition effect. Corel provide many kind of transitions such as push, flashback, fade, etc. Every selected transition will by preview in the preview panel. Drag the transition you want and put it between 2 photos. I usually use crossfade transition... :D

After everything is OK, now set the duration of each photo to appear. You can set the duration of each photo by dragging the yellow area in photo. Make it equal with the song duration so when the song fade out, the slideshow fade out too.

create slide videos

After all is OK, export your slide into video format or directly burn it to DVD.

slideshow videos

Tips:
- Set the slide transition according to the beat of your background music. That's will make your slideshow better
- Set your slide speed according to the background music's beat
- Avoid black bar in your slide. Black bar usually appear when you use a portrait photo, avoid it if you want to make your slide better looking.. :D
Here is a simpe tutorial about applying a glowing effect to any objects in your workspace. This object could be a brush, shape, cropped photos, etc. Here we go:

First, you can create a blank new file or just open the image you want to edit. Create a new layer by clicking ctrl + shift + n. For example I use brush (B) to create an object. Double click the brush's layer in the layer tab, then you got layer style dialog box.

efek cahaya

Checklist the outer glow option, then customize the setting with you want or you can just follow the above screenshot. Click OK to apply glowing effects to the object.
You can expreiment with other style and settings :D

glowing object
Now I share you a tutorial to create a karaoke version song. Karaoke song had 2 channel of audio, instrumental (usually on left channel) and song with vocal (usually on right channel). This tutorial is using adobe audition so make sure you already had the software :D
I use adobe audition version 1.5

Ok, first import the audio that you want to make it karaoke version to audition workspace. The song you load must be stereo channel otherwise this tutorial isn't work.
Navigate to effects tab - amplitude - channel mixer. Here is channel mixer, move the slider like the picture below.
Actually this is not the best settings, it depend on your song itself so hear the preview and drag it slowly to get a best result (inst. only on the left - vocal on the right)

karaoke sound

As the final touch, you can amplitude the volume of instrumental channel only because instrumental channel usually need more gain then the vocal channel. Just make it balance... :D

make karaoke version audio

To amplify the selected channel, goto effects - amplify/fade. Gain it a few dB (for example 3dB)
If you enter too high value then it will be over gain so be sure to enter the right value. You can always hit preview button to hear the changes... :D

OK, now you're done. You can now save it to many kinds of audio format.

left and right channel

If you had any question, contact me via comment below :D
You had a good song but unfortunately it's in karaoke version (left instrument, right vocal channel)? Here is a very easy audio editing tutorial that will convert your karaoke song into stereo version so you can more enjoy it.

This tutorial using adobe audition so make sure that you already install the sotware. At first, import your song file into audition workspace, here I use an old Adobe Audition 1.5.
- Navigate to effects tab - amplify - channel mixer.
- Here is channel mixer menu.

karaoke to stereo

There's 2 options. If the vocal channel is in right, then you choose pan center left just like above.
If the vocal channel is in left, then choose pan center right.
- Click OK to apply changes
You karaoke song should now become a normally stereo channel. You can also set the new left and right channel independently to get a better results.

Tips: You can always hit preview button to make sure the song's channel is properly aligned as stereo version.
Good luck, if you have any uestion, please give me a comment :D
In this post I'll share you a brilliant trick to place the ads inside of your post automatically by using javascript. By placing your ads inside the blog post then hopefully the chance of ads is viewed is greater than any place of your site and will increase the chance it clicked.

Here I show you the google adsense heat map that explain the most strategic place to put your ads. Based on the heat map, this javascript will place your ads inside the primary content.. :D


I'm not the creator of this javascript, I just googled it and modify to make it works well. The prototype isn't look well so I edit the script and make it better :D
I'm sorry because I forgot the source since I found it long time ago.

I also add a random features to it, make the the script could change the ads position while inside the blog post. So, when page is reload, you'll notice the ads position is changed.

Well... here is the script I make it for blogger version. You can also adapt it to other platform since the algorithm is simple :D

How to install:
- open edit HTML in your blog, tick expand widget template.
- find data:post.body
- change data:post.body with the main script
<!-- script shared and modified by blog-tutorial-menarik.blogspot.com -->
<div expr:id='&quot;aim1&quot; + data:post.id'/>

<b:if cond='data:blog.pageType == &quot;item&quot;'>
//YOUR AD CODE
</b:if>
<div expr:id='&quot;aim2&quot; + data:post.id'>

<data:post.body/>

</div>
<b:if cond='data:blog.pageType == &quot;item&quot;'>
<script type='text/javascript'>
var a=Math.floor(Math.random()*3)+1;
var obj0=document.getElementById(&quot;aim1<data:post.id/>&quot;);
var obj1=document.getElementById(&quot;aim2<data:post.id/>&quot;);
var s=obj1.innerHTML;
var t=s.substr(0,s.length/a);
var r=t.lastIndexOf(&quot;&lt;br&gt;&quot;);
if(r&gt;0) {obj0.innerHTML=s.substr(0,r);obj1.innerHTML=s.substr(r);}
</script>
</b:if>
<!-- Please do not remove the copyright line -->
- Save template
Easy right?

Is this legal? I think it's legal because we don't modify the ad code at all. However, if you not sure, you can ask them :D
For the live demo you can see it at my other blog

Hopefully this trick is useful for you. If you developed a better version of this script, don't hesitate to share it here.
I noticed that since google reader change the user interface, "make public" option in folder and tags is missing. I don't know they removed it intentionally or they just "forget" to add it back to the new UI... :D You can see my previous post about embed google reader feed to website and make public option still there.

After searching through google help forum, many people talk that it's a bug. Some of their suggestion is using some kind of google chrome extension to reverse back google reader into its old UI while others said to choose another RSS feed service :D. Further reading, then I found a simple solution to get your feed or label accessible to public. So far I tried and it works.

To resolve the public feed issue in the new google reader interface, you can simply create a bundle. For example I use a label called MONITOR

Select your label, then choose create bundle. In the next page you can add or remove the RSS feed. Click save to create a new bundle.


Here is the bundle I created, you can see "add a link" there, that link will work like a public feed, which is accessible to others :D


I've tried that and it work fine..... :D