Photoshop create lens blur effect

Posted by Andi Syahputra | 10:54 PM
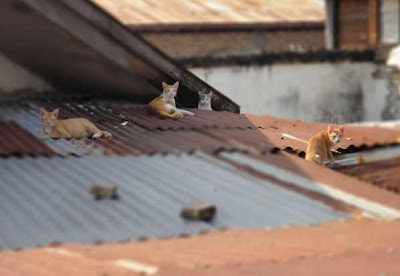
Lens blur effect usually happen naturally when you shot object using DSLR camera. It's hard to get your background photo blurry while using pocket camera because the lens in pocket camera doesn't had a flexible depth of field. In this post I will share how to create a blurry background photo using photoshop.

Blur effect usually uses to enchance the point of interest of photo's main object. There's some techniques to make a good point of interest in photography, I'll explain in the next post... :D
Well, here's the step by step process:
- Open your image
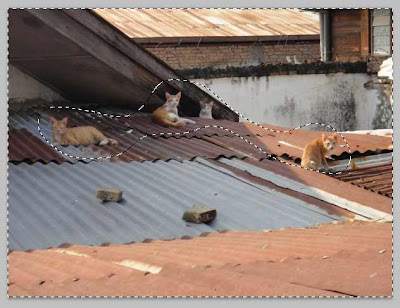
- Choose lasso tool then select the main photo object first, that will be a point of interest.


- You can set the feather into 40-50 px to make your selection smooth the outer area. Open feather menu by pressing Shift+F6. Feather will help you to reduce the boundary between the focus and the blurry area.

- Inverse the selection (ctrl + shift + i) This will invert the selection into background.


- Now go to filter - blur - lens blur. Change the amount of blur in radius menu.
- Click OK then you've got the blur effect applied to the photo.

Adobe premiere is one of the most popular video editing software around the world. There's so many feature in adobe premiere pro, from basic to advance features with all of its complexity. Now I will share you the basic use of adobe premiere pro, from importing video process until encoding and save project..... :D

At first, make sure adobe premiere is already installed to your system. You can buy it or install trial version of adobe premiere pro. This software had a pretty high system requirements. For a low spec computer perhaps it's will be a little bit slow start-up.
Here is adobe premiere pro CS4 start-up screen.


After splash screen there's a new project window. Give a your project a name, then OK. Then choose the profile that will apply to project. Please choose the profile exactly match to your current video format, for example if your project is a mini-DV format, then choose it DV NTSC or DV PAL according to your region standard. DV resolution is 720x480 pixel.


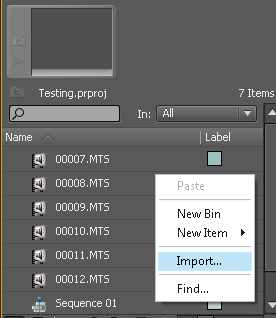
The workspace will appear with the timeline panel for your video file. Import your video by right click - import in the upper left tab. Adobe premiere fully support many kinds of video format. If your imported video lose it's pictures or sound, then you can convert you video first into general video format such as AVI or MPEG-2 using video converter.


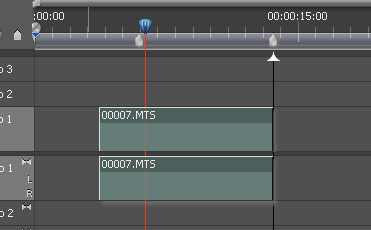
Drag the imported video into timeline. Then you can start edit your video here, you can see the preview during editing in the upper right preview panel.


Here you can cut, apply effect, apply filter etc. Choose the tools from the right panel of the timeline workspace.
After you edit the video, then you can save your project for further editing, or if you want to finalize it, choose menu file - export - media.


Here is export settings. There's many kind of presset, make sure you choose the preset that match to your profile. You can do an experiment yourself by setting the option independently...
:D


After all settings is OK click OK button to start encoding. Adobe media encoder will show up.


Your project is listed in queue list, click start queue button to encode the video. Encoding process will take a while, according to your video duration and the format you choose.


OK, that's the basic use of adobe premiere. Hope you understand what I'm share here.. :D
Honestly to say, if you want more basic video editing software, I recommend to use corel video studio. It much easier than adobe premiere, only less advanced features than adobe premiere... :D

Easy step to fix under-exposed photo

Posted by Andi Syahputra | 10:01 PM
Now I will share you an easy trick to rescue your dark photo (under-exposed). Under-exposed photo usually cause by un-trigger camera flash, or incorrect camera settings such as ISO too low, Shutter speed too high, etc) when you use your camera in manual setting.

But don't worry because it's easier to fix under-exposed photo then fix over-exposed photo.
Here is step by step procedure to fix your photo in photoshop workspace:
1. Open your under-exposed photo to photoshop.

Here's the example :D


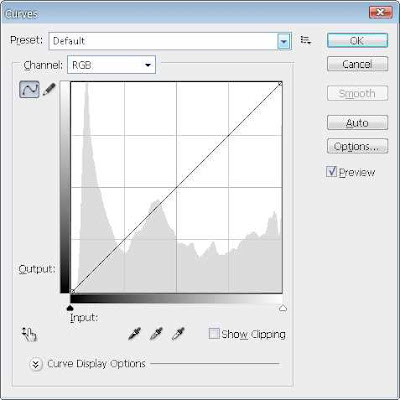
2. The first method you can use is curve method. Open curve menu (Ctrl+M), drag the diagonal line in direction to left corner in the top curve. Drag it until you got the well exposed photo.


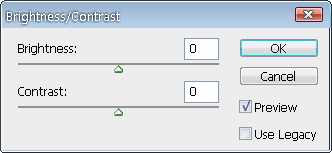
3. The second method is to use brightness/contrast feature that you can find it in image - adjustment. Not like the curve menu that override birghtness and contrast at the same time, this method is providing brightness and contrast gain separately so you can just gain brightness independently.


Other method is to use levels (Ctrl + L). This method is very similar to curve.
Very simple right? Actually there's more complex method to fix under-exposed photo but if you can find easier method, why not? :D

Here is the photo above, after I fixed it using curve and birghtness/contrast adjustment.


Hope this tutorial is useful for you. I'm sorry if I had a mistake when sharing this tutorial to you. Thanks for visiting.. :D

Using virtualdub to encode video

Posted by Andi Syahputra | 4:12 PM
Virtualdub is a freeware that can convert and re-encode video format into a smaller video size. Follow this simple explanation of how to use virtualdub to encode video files.

First, import your video by choosing file - open your video file. Virtualdub support major video format like AVI, MPEG. You can use virtualdub filter pack to make it support other video format such as MPEG-4.


If your video file is split into 2 parts, you can append it into 1 part by choosing append AVI segment menu. Both files will be joined and loaded into preview pane.

Next, choose the video compression (menu - video compression). There's many of encoder profile. Choose which best for you, for example I use Xvid MPEG-4 codec. This codec will convert the video into AVI file using Xvid mp4 codec.


Press OK and then goto menu - file - save as AVI. The encoding process will start.

If you not define the output resolution then the encoded video resolution will follow the source resolution. I've convert my 8GB AVI video file (uncompressed) with this profile and the result is 220 MB AVI file with the same resolution. The picture is still clear and the sound is good too.... :D

Try it yourself by download virtualdub below. Don't worry it's free.. :D
Download virtualdub freeware
Here is th simple trick to make your notepad insert date and time automatically each time you edit it. This is very useful if you want to type an article and save the last date and time you type it.


Here is the step by step:
1. Create a new blank text document.
2. Type .LOG at the first row, then press ENTER
3. Then type your stuff and save it

The date and time will automatically added to the text document.
It's very helpful to gather information about when the last time you modify the file.

Simple recent posts for blogger

Posted by Andi Syahputra | 10:37 PM
There's so many complex widget out there that provide ability to show the most recent post in your blog. Now I will share you a very simple javascript snippet that show recent post from your blog, sort by label so if you want to get recent post from any label of your blog, you can get it with this script.

You can simply copy paste this script below:

<script type="text/javascript">
function recentpostslist(json) {
for (var i = 0; i < json.feed.entry.length; i++)
{
for (var j = 0; j < json.feed.entry[i].link.length; j++) {
if (json.feed.entry[i].link[j].rel == 'alternate') {
break;
}
}
var entryUrl = "'" + json.feed.entry[i].link[j].href + "'";//bs
var entryTitle = json.feed.entry[i].title.$t;
var item = "<br>" + "<a href="+ entryUrl + '" target="_blank">' + entryTitle + "</a> </li>";
document.write(item);
}
document.write('</br>');
}
</script>
<script src="http://fun-tutorial.blogspot.com/feeds/posts/summary/-/LabelName?max-results=10&alt=json-in-script&callback=recentpostslist"></script>


Here is the explanation
- paste this script through add gadget - HTML/javascript
- Change fun-tutorial.blogspot.com with your blog URL
- max-results=10, which means the script will fetch 10 post of your most recent post in those label. You can set it more if you want.
- Change LabelName with the label you want to show, case sensitive please.. :D

For additional info, if you want to fetch recent posts without label, change the URL
http://your blog url.blogspot.com/feeds/posts/summary/-/NamaLabel
to
http://your blog url.blogspot.com/feeds/posts/summary

Hope this help.. :D

Quick blogspot photo resize

Posted by Andi Syahputra | 11:19 PM
I found this trick long time ago... :D You can easily resize photo in blogspot only by change the path of URL.
This trick works well for blogger image hosting such as bp.blogspot or google picassa that use URL like lh.googleusercontent.com

Change the bold path with the value you want. Please note that wrong changing value would result in 404 error... :D

View the examples:
https://blogger.googleusercontent.com/img/b/R29vZ2xl/AVvXsEhSFMkdABJQdR46NEfIXZdIndCjP8B8zYGpLVIzvkwxFg6G50hqoalORCi66Pa5DpMcZ-XylXVj60RMLH3hGks1WbXk5In6q3M1RtHNtqHRtPMhWWcUemoHNYPtL-myh8NRS50OJZbz-nYS/s1600/blogtutorialmenarik.jpg
That's the real size, if you enter s1700 then if will be 404.

https://blogger.googleusercontent.com/img/b/R29vZ2xl/AVvXsEhSFMkdABJQdR46NEfIXZdIndCjP8B8zYGpLVIzvkwxFg6G50hqoalORCi66Pa5DpMcZ-XylXVj60RMLH3hGks1WbXk5In6q3M1RtHNtqHRtPMhWWcUemoHNYPtL-myh8NRS50OJZbz-nYS/s100/blogtutorialmenarik.jpg
s100 means the picture resolution will be 100x100px stretched

https://blogger.googleusercontent.com/img/b/R29vZ2xl/AVvXsEhSFMkdABJQdR46NEfIXZdIndCjP8B8zYGpLVIzvkwxFg6G50hqoalORCi66Pa5DpMcZ-XylXVj60RMLH3hGks1WbXk5In6q3M1RtHNtqHRtPMhWWcUemoHNYPtL-myh8NRS50OJZbz-nYS/s50/blogtutorialmenarik.jpg
thumbnail 50 px stretched

If you want the picture is cropped instead of stretched, add -c at the end of value, for example from s200 to s200-c. That will cropped the photo and preserve photo aspect ratio.
You can test other picture to see the difference :D
Perhaps you want to make all hyperlinks in your site to open in new tab instead of same window. You don't need to add target='_blank' to each link because this one line HTML code will do this for you.. :D

Simply copy this code and put it within the HEAD tag of your template.

<base target='_blank'/>

So easy right?

Create HTML rainbow text effect

Posted by Andi Syahputra | 1:03 PM
You want to create a colorful text for your site?
Easy, just apply the color attribute each character. But I'm sure you don't want to make it manually right? :D
So in this short post I just want to share an automatic generated rainbow text effect for text yor entered.
Rainbow text maker could make it happen by parsing you text into a colorful rainbow, fast and automatic. Here is the example:

WELCOME TO FUN TUTORIAL
Your site had a good article but there's so many content scraper copy your content without link back to you? Well, I had a cool trick for you to block them from stealing your content. It's very simple.

I use a simple javascript event to block copy pasting content. There's so many javascript utility that you can find through the net but most of them had a long script, such as disable right click, disable text select, disable copy, disable keyboard shorcut, etc.

With this script your text could be read, but can't be select to copy it. Well, here is how to disable copy pasting to your site.


Open your template HTML then find <body> tag. Then add the following script to it. You can choose one of the script or use it all if you wish... :D
- onmousedown='return false;' = disable mousedown event (but not disable click event)
- onkeydown='return false;' = disable keyboard shortcut
- onselectstart='return false;' = disable text selecting
- oncontextmenu='return false;' = disable context menu (right click)
- oncopy='return false;' = disable clipboard

So, the final look of body tag if I only use onmousedown become like this: <body onmousedown='return false;'>
save your template.

So, is your content 100% protected? Unfortunately no....
Still not possible to make it 100% protected since the HTML code is open to everyone. At least this tips can make the content scraper harder to get content through your site.

As a bonus script, you can put NOSCRIPT tag to block access for javascript disabled browser:
<noscript>
<div style='width: 100%; height:100%; background: blue; text-align: center; position: fixed; top: 0px; z-index:100; left: 0px;'>
<h1>Javascript is disabled. Please enable javascript.</h1>
</div>
</noscript>

Hope this help. If you want more secure protection, you can try to encrypt your HTML code or use server side language such as PHP to hide your source code.
What would you need when you want to share your internet connection with your friends, that use wi-fi enabled device? Wi-fi router? Yes, With Wi-Fi router you can easily share your internet connection with your friend, just turn on.... assign IP.... etc...
Instead of using a router, you can also turn your laptop into a Wi-Fi router. That's what I want to share with you in this post.

First you need a laptop with Wi-Fi enabled and of course, internet connection. It's up to you, via DSL cable (broadband) or GSM/CDMA modem.


The theory is, if we use an ad-hoc networking to connect all devices while the host device had internet, then the internet can be shared through the client connect to it.

So, at first step, create a new ad-hoc network:

- Open your network connection - wireless network connection


- Right click properties, open wireless networks tab


- At preferred networks, click add button
- Fill the network name, uncheck the key is provided for me automatically option, then enter your network key. Sometimes it required to had a minimum 10 character password.
- This is the most important, don't forget to check this is s computer-to-computer network.
- Then your new ad-hoc network is created.

Now, after your clients is connected. right click your internet network connection, then choose properties. For example here, I use broadband connection.


Choose advanced tab, then tick option 1 and 2, as the screenshot below. Make sure your home networking connection is point to wireless network connection.

Click OK then you can now share your internet connection through your connected clients.
I Tried this in windows XP professional and it works. Please note that this isn't work in windows XP home edition.

Create a simple javascript character counter

Posted by Andi Syahputra | 11:11 PM
Just sharing to you a simple javascript character counter that counts every input character in realtime. When you enter any character in input box, the script will count the total character you entered after you release keyboard press (onkeyup event), then display the number of character you typed.

Let's try it yourself. Here is the HTML code, paste it to blank HTML document and you're ready to go.. :D
You can also apply this small utility to your project or webpage.

<title>Character counter</title>
<form method="POST">
<table border="0" cellspacing="0" cellpadding="0">
<tr>
<td width="100%">
<textarea rows="30" name="charcount" cols="160" wrap="virtual" onkeyup="countit(this)"></textarea>
</td>
</tr>
<tr>
<td width="100%"><div align="right"><p>Jumlah karakter: <input type="text" name="displaycount" size="20" readonly="readonly"></p>
</td>
</tr>
</table>
</form>
<script language="JavaScript">
function countit(what){
formcontent=what.form.charcount.value
what.form.displaycount.value=formcontent.length
}
</script>
Now I'll share to you a trick to reverse audio signal. So the audio is played from finish to start. It usually use in remix songs to create a cool effect. Here is the steps :D

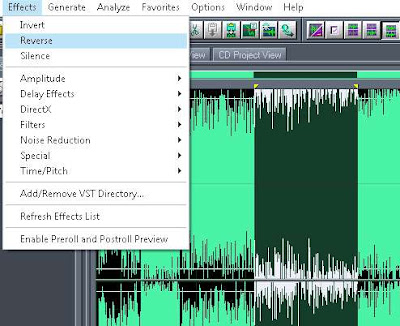
Open your adobe audition and import the audio waveform. Select the area of audio you want to reverse. Go to effects menu - reverse, see the screenshot below

Audio reversing

The selected area will be reversed. You can test to play it and hear the audio :D


Tips:
You can use this effect to make a secret recording so anyone that hear it without reverse it back will be confused :D
Hey, why don't you try to reverse your own voice?
With this trick you can convert audio faster than any audio converter can do. And of course it's support batch conversion. All audio editing tutorial in this blog always use adobe audition to perform it.. :D So, this tutorial also use it.

I utilize the batch processing utility in adobe audition that could convert many audio files sequentially with a super conversion speed.
Here is the trick:
Goto file menu - batch processing, look the screenshot below:


First, add audio files you want to convert. Then change the destination where you want to save converted audio. Next, click the new format and change it with the setting you want.
For example if you want to compress your file to save disk space:
output format *.mp3
Single channel (give a checklist to "convert to mono" option)
pilih yang 56kbps, 44100hz
Then click run batch


The process will start automatically. The audio file is imported to the workspace then immediately converted to the selected new format. This happens less than 15 seconds per file, according to the length of your audio file too.
Try it... :D

Change hair color using photoshop

Posted by Andi Syahputra | 8:39 AM
You want to change your hair color but you worried about the impact of your hair's health? Easy, you can colorize your hair virtually using photoshop :D
Here is how....

You may think that the method is very easy, just replace the hair color. But doing this will remove the hair texture and make it look terible, really... :D

Here is the step by step tutorial to change hair color. I use variations to replace the hair color but still keep its texture:

- Open the file you want to edit

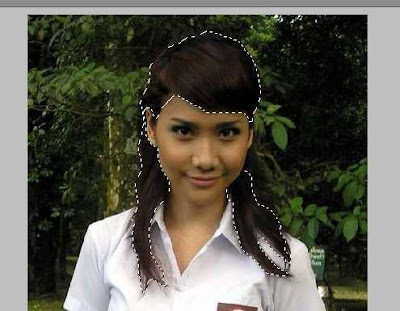
mewarnai rambut

- Select the hair of the object using seletion tool. You can choose lasso tool, magnetic lasso tool or quick selection tool. To make your selection more detail, you can use magnetic lasso tool and zooming the object while selecting.
Here is the result, not a detail selection actually.. :D

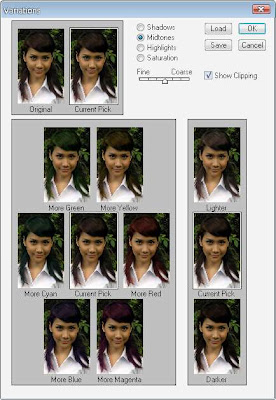
variations

- Goto image - adjustment - variations. Here is the preview of effects you can apply to hair.

edit warna rambut

- You can choose color, adjust color intensity, customize the settings till you get the best result you want.
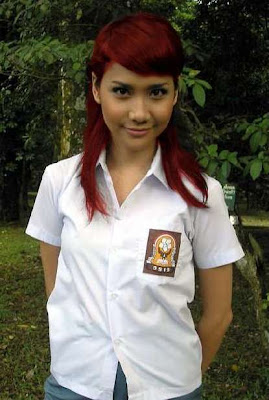
- Finally, here is the results. Pretty cool right? :D

ganti warna rambut


Tips:
You can use feather to make the outer selection smoother, set the px from 5 - 10. It enough to make it smooth.
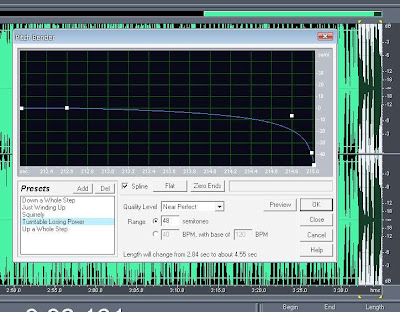
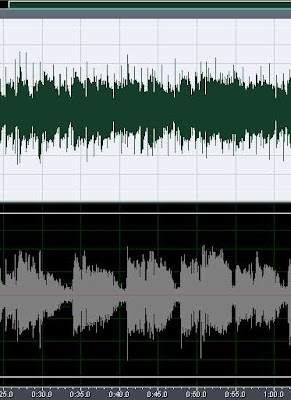
Lose power effect is to apply a speed manipulation to your waveform. It's generating an effect like a turntables lose it power, so the song is going slower and then stop. Here is a trick that you can do it easily using adobe audition.

Import your song then select which part that you want to apply the effects, then goto effects tab - time/pitch - pitch bender. Here is pitch bender dialog box
lose power effects

There's already include in preset the lose power effect, click on it then apply the effect. You can edit the preset with your own configuration till the effect meet your requirement.
Higher graph means the faster tempo (the audio tone become higher too, like a chipmunk voice :D), and vice versa.

That's all, don't forget to save the audio... :D
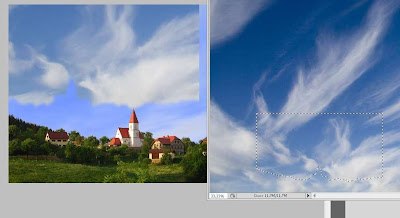
Actually this tutorial is very easy to do. You only need photoshop, here is how to do it:

Open your photoshop and import the photo you want to change its background, for example I will change the sky of this photo, and replace it with another "sky".

ganti background

First create a selection to the area you want to remove. You can use quick selection tool (W) to perform this.

ganti background

To make the outer of selection area smooth, you can use feather (Shift + F6) and set it to 5px.
After that press M to make the selection movable.
Open another "sky" photo and put it beside the first photo. Drag the selection to second photo.

ganti background

ganti background

By using move tool (V), drag the selection back to the first photo. The sky from second photo will be cropped to the first photo.

ganti background

The final step, move the sky that we cropped before to match exactly with the first photo. Background is successfully replaced... :D

Tips:
- Make sure the color tone of both photo is equal or same. Otherwise, the photo won't look natural.
There's so many software out there that we can use to create a slideshow. Even some of them provide an automatic feature to create slideshow, just drop photos and background music then the slideshow is created. Now I will show you how to create a photo slideshow using corel video studio x2.

By manual create photo slideshow, you can get a better slideshow because it's more structured then automatic one that use random transition and random style. Plus you can build the "mood" of photo slideshow itself.

At first import the image sequences to corel workspace. Usually still image had a duration to 3 seconds by default. You can set it later.
It's better that you edit the photo first before import it to corel. You can crop, adjust brightness/contrast, etc to beautify the photo.

membuat slideshow

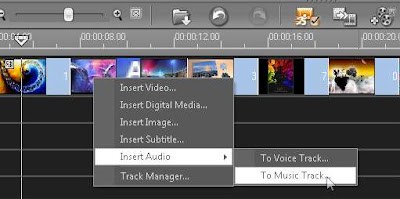
After that, you can add background music to it, right click insert audio - to music track.

buat slideshow corel

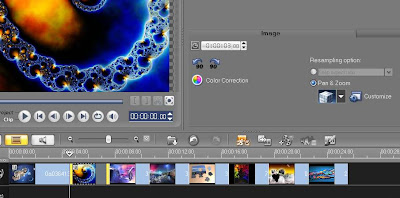
Add pan and zoom effect to every photo, drag pan and zoom effect from preset menu. You can also add more effect to make your slide more dynamic. You can customize the effect one by one if the default style not suitable for your photos.

slideshow making

Now we goto transition effect. Corel provide many kind of transitions such as push, flashback, fade, etc. Every selected transition will by preview in the preview panel. Drag the transition you want and put it between 2 photos. I usually use crossfade transition... :D

After everything is OK, now set the duration of each photo to appear. You can set the duration of each photo by dragging the yellow area in photo. Make it equal with the song duration so when the song fade out, the slideshow fade out too.

create slide videos

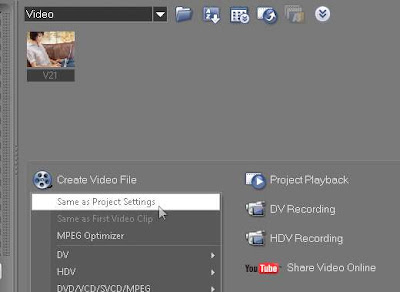
After all is OK, export your slide into video format or directly burn it to DVD.

slideshow videos

Tips:
- Set the slide transition according to the beat of your background music. That's will make your slideshow better
- Set your slide speed according to the background music's beat
- Avoid black bar in your slide. Black bar usually appear when you use a portrait photo, avoid it if you want to make your slide better looking.. :D
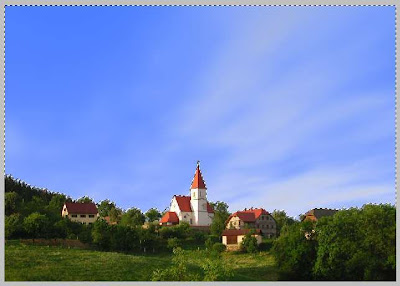
Here is a simpe tutorial about applying a glowing effect to any objects in your workspace. This object could be a brush, shape, cropped photos, etc. Here we go:
First, you can create a blank new file or just open the image you want to edit. Create a new layer by clicking ctrl + shift + n. For example I use brush (B) to create an object. Double click the brush's layer in the layer tab, then you got layer style dialog box.

efek cahaya

Checklist the outer glow option, then customize the setting with you want or you can just follow the above screenshot. Click OK to apply glowing effects to the object.
You can expreiment with other style and settings :D

glowing object
Now I share you a tutorial to create a karaoke version song. Karaoke song had 2 channel of audio, instrumental (usually on left channel) and song with vocal (usually on right channel). This tutorial is using adobe audition so make sure you already had the software :D
I use adobe audition version 1.5

Ok, first import the audio that you want to make it karaoke version to audition workspace. The song you load must be stereo channel otherwise this tutorial isn't work.
Navigate to effects tab - amplitude - channel mixer. Here is channel mixer, move the slider like the picture below.
Actually this is not the best settings, it depend on your song itself so hear the preview and drag it slowly to get a best result (inst. only on the left - vocal on the right)

karaoke sound

As the final touch, you can amplitude the volume of instrumental channel only because instrumental channel usually need more gain then the vocal channel. Just make it balance... :D

make karaoke version audio

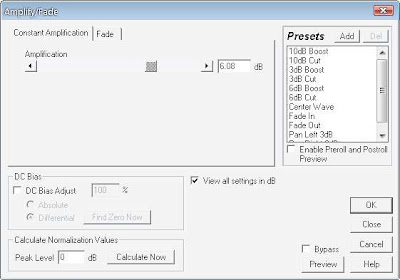
To amplify the selected channel, goto effects - amplify/fade. Gain it a few dB (for example 3dB)
If you enter too high value then it will be over gain so be sure to enter the right value. You can always hit preview button to hear the changes... :D

OK, now you're done. You can now save it to many kinds of audio format.

left and right channel

If you had any question, contact me via comment below :D