
But don't worry because it's easier to fix under-exposed photo then fix over-exposed photo.
Here is step by step procedure to fix your photo in photoshop workspace:
1. Open your under-exposed photo to photoshop.
Here's the example :D


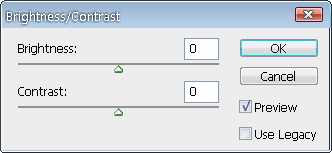
3. The second method is to use brightness/contrast feature that you can find it in image - adjustment. Not like the curve menu that override birghtness and contrast at the same time, this method is providing brightness and contrast gain separately so you can just gain brightness independently.

Other method is to use levels (Ctrl + L). This method is very similar to curve.
Very simple right? Actually there's more complex method to fix under-exposed photo but if you can find easier method, why not? :D
Here is the photo above, after I fixed it using curve and birghtness/contrast adjustment.

Hope this tutorial is useful for you. I'm sorry if I had a mistake when sharing this tutorial to you. Thanks for visiting.. :D
Post a Comment