Actually I had this problem for a long time in my notebook. While you use keyboard the touchpad can't run, otherwise too. It's annoying when you play a shooting game because the game character can't shoot and run at the same time... :D

First I think this is hardware issue, then I try to looking for the solution about this and fortunately, I found the solution. The default settings of touchpad driver that cause this so you only need to set the touchpad sensitivity to higher value.

Here is the screenshot of my touchpad settings. My notebook use synaptics touchpad. Most of the notebook today use the same hardware I think. So, all you need is open the driver settings, navigate to pointing menu - sensitivity - palmcheck. Change the setting to minimum, which means that you touchpad respons area is wider (more sensitive).


Click OK to apply changes and now test it. Type a word using keyboard while you use touchpad to move the cursor. It works... :D
If your touchpad hardware isn't from synaptics, just find the settings yourself and set the palmcheck to the minimum, that's the solution...

Create karaoke song, method 2

Posted by Andi Syahputra | 11:29 PM
I've share the same topic in my prevoius post about how to create a karaoke song, but now I had another method (a better method) how to create a good quality of the song in karaoke version.

What you need is a 2 version of song, first is normal version (with vocal) and second is instrumental version (no vocal). So both of this version will be joined together in adobe audition, to each channel, left and right. Usually the recording studio release an official instrumental version of the song. You can search it trough youtube for example... :D
If you didn't find instrumental version, you can try to remove the song vocal by yourself.

Ok, here is the tutorial:
1. First import the 2 both song version to audition workspace.


2. Create a new waveform (ctrl + N)


3. Goto your instrumental song, select only one channel, left or right, then copy it.
To select one channel only, you can double click the upper / lower of the workspace.


4. Go to the new waveform you created, then select just one channel too. After that, paste it. So, now it will be like this.... :D


5. Do the same with the vocal version. Select other channel, then paste it to the new waveform.


6. So, your new waveform now contain both version of the song each channel.
Usually the song timing in both channel isn't same. To sync both channel, use delay effects.. :D


Delay feature will set the timing of each channel. Set it until both channel is synchronized.


There's no exact settings here because it depend on your waveform.


After you set it, click OK to apply the delay.
That's it, you had the karaoke version song right now.
You love timelapse photography so much but don't have a capable camera to perform it? Don't worry, with this small java application it will turn your mobile phone to act like timelapse camera. You can capture photo automatically with interval that you can set.
I've got this problem several days ago. So, If any of you had the same problem perhaps this tips could help you to make your windows explorer can drag and drop files again.

Drag and drop is a very often used windows explorer feature, you can move files to foder, copy just by drag and drop. I got this issue when I'm updating my windows XP SP2 to SP3. So, I had to cut and paste when I want to move files, and that's a little annoying.. :D

After I search everywhere, I got a simple fix to make the drag and drop feature back to work.
You just open regedit, then navigate to HKEY_CURRENT_USER/SOFTWARE/Microsoft/Windows/CurrentVersion/Internet Settings/Zones/4 path, find the DWORD key named 180D, set the value to 0. If you can't find such key, create a new DWORD key with name 180D and set the value to 0.

Hope this solve your problem... :D

Remove red-eye using photoshop

Posted by Andi Syahputra | 11:32 PM
Red-eye in a photo usually cause by reflection of the camera flash, making the eye looks like a devil.. :D. Here is a simple trick to remove red-eye using photoshop.

Photoshop had a special red-eye removal feature that you can use:

1. First open your photo


2. Now click red-eye tool (J)


Set the red-eye amount, locate below the photoshop menu.


3. Click the red-eye area, then the red-eye will be removed.


4. Final result.. :D

Create fisheye effect to photo

Posted by Andi Syahputra | 11:31 PM
Fisheye is one of the style in photography that makes a photo look like the point of view from fish perspective (distorted and wide angle). In order to get this kind of photo, you need a special lens called fisheye lens. In this tutorial I won't use fisheye lens but using photoshop to create a fisheye effect to the photo.

Before going to tutorial, here is the example of the REAL fisheye photo.


Another version


Here I had 2 techniques to create a fisheye effecr using photoshop, I'll tell you one by one. You can use photo with any resolution.
Here is the method 1:
1. Open your photo then press ctrl + A to select all area.


2. Choose edit menu - transform - wrap


3. Choose fisheye preset. You can customize the blend value Pilih preset fisheye.


4. Click OK and here is the result.


Here is the method 2:
1. Open your photo, make an eliptical selection to the main object.
Change the photo into layer by double click the background in the layers tab.


2. Inverse selection by pressing ctrl + shift + I
Then press delete button to remove background.


3. Press ctrl + shift + I again to select the main object. Then goto filter menu - distort - spherize


4. Here is the fisheye effects will be generated. Slide the amount till you got the optimum fisheye effect. Click OK to apply effect


5. Now you got the "fake" fisheye photo.
Next, you can fill the background to make your photo looks nice.
Black background, just like the real fisheye photo.. :D


Also you can add a gradient to it.. :D


So, which method is better? it's up to you.. :D

Photoshop tips - create a photo frame

Posted by Andi Syahputra | 11:43 PM
Actually there's so many photo frame out there that you can download and use it immediately. But how to create your own photo frame? Here is the tutorial, creating a minimalist frame for your photo.

1. Open your photo

2. In order to make the photo editable and add frame to it, you must change the photo into a layer first. Double click background (as the screenshot below) then click OK to change it into a layer.


3. Double click again to layer then appear layer style.

4. Actually the frame I want to create here is just using inner stroke then apply emboss and gradient through it. So, tick stroke option then set the stroke posititon into inside instead of outside. Set also the thickness of the frame, for example 10px.


5. Not only with color, you can fill the stroke with pattern oor gradient.


Here is example by using gradient. You can customize your own gradient and apply it to the frame.


6. For additional effect, add bevel and emboss to make the frame looks better. Click OK to apply effect to your photo.

Tips to create a good slow speed photo

Posted by Andi Syahputra | 10:40 PM
This technique is known as slow speed photography, capturing photo with a slow shutter speed to create an amazing effect for lights and other moving objects. Lets read further how to doing this and create a wonderful slow speed photo. All you need is a camera (DSLR or other types) that had manual setting option. No manual setting, then you can't do a slow speed photography.

The most important things in this technique is the camera MUST stay still, even a very small vibration could result blur to your photo.

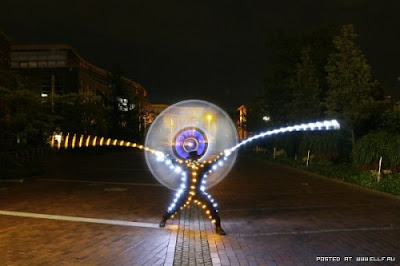
Example of slow speed photo, source from google images.
Very cool right?


If you want to see more example, you can visit smashing apps. There's 45 amazing photo captured in slow speed style.

Before goto the tips, here is additional info about what factor that influence the result of slow speed photo.

- Shutter speed
For normal shoot photo, shutter speed usually from 1/60 to 1/125 sec, but in slow speed shooting, the shutter speed must longer than that, say form 4" (seconds) - BULB (Manual release shutter). Usually DSLR's automatic shutter speed ony reach until 30", when you're in BULB mode, that manual shutter. You can hold it as long as you want for shutter to close (photo captured).

- Aperture
Aperture is known as f value. For normal photo the f value is f1/8 - f6/8 but in slow speed photo, the f number must be as small as possible, let say from f16 - f22. Actually this setting is depend on what lens you use.

- ISO
ISO is a light sensitivity, higher ISO means higher noise to your photo. In slow speed photography, we don't need a high ISO so you can set it to lowest, such as ISO 125

By decreasing your shutter speed that means more light will be captured by photo sensor, so you can use lens filter (ND filter), set the lowest ISO, set the small aperture to make the result not overexposed.

There's also a light painting photography, that using slow speed technique too. The different I think is only the media. Light painting is done in a totally dark area, so only the light will be captured with a dark background.

Tips to create a good slow speed photo:
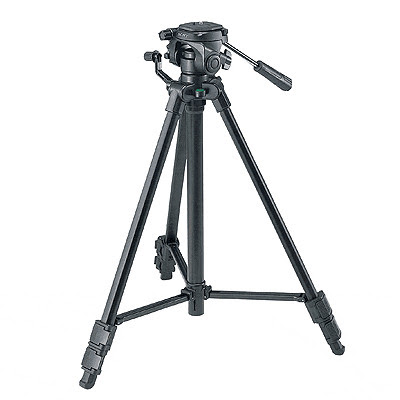
1. Put your camera to a static place, avoid any vibration that may occur while capturing.
Using this is will help you much, a tripod.... :D
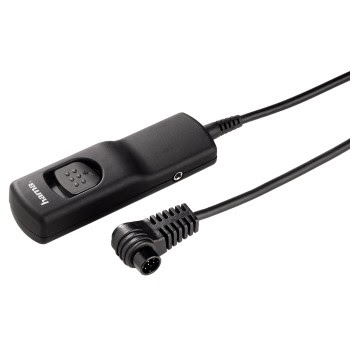

2. Using self timer
The camera body shake when you press the shutter button. That's could result a blur sow speed photo, so you need to use a self timer to make sure the camera body is still, then start capturing. Hey, you also can use cable release to press the shutter button without touching the camera body.


3. Set your shutter time
If you want to capture human object, use a short period of shutter, for example 5". Human object is very difficult to stay still for a long time, so make sure to set the right timing to avoid blurry because the object is very easy to move.. :D

That's different when you shoot a dead object such as road, building. You can set as long as you want.. :D

4. Take attention to exposure
Slow speed photo very easy to get over exposed. Make sure you do a test shoot several time to get a well exposed photo.

Well that's the tips.... Hope this inspire you to create a slow speed photo :D

Create a DTMF telephone tone

Posted by Andi Syahputra | 10:27 PM
I think this tutorial works better is you join with my previous tutorial about create a telephone voice effect, this time I'll share you a tips to create DTMF tone using adobe audition.

DTMF is abbreviation of Dual Tone Multi Frequency. It's a tone that triggered when you press the telephone button (0 - 9, *, and #). Each telephone button had their own unique frequency. By using adobe audition you can easily generate DTMF tone. Here is the steps:

1. Create a new waveform (ctrl + N)
default settings: 441000hz, stereo, 16 bit.
You can also append it to your existing audio file instead of creating a new waveform.

2. Open effects tab - generate - DTMF signals.


3. Fill the dial string with the number you want.

4. Here is some settings you can change:
- tone time = length of each tone
- break time = separation between one tone to another
- pause time

5. Click OK and the tone will generated.


Easy right?
For additional info, you can also create a standard telephone waiting tone. Still in the generate menu, now you choose tones...

Kotak dialog tones

See the screenshot above for the settings, change the duration as you wish... :D
Click preview to hear the tone, then click OK to import it to your waveform.


Thanks for your visit... :D
This tutorial will turn your photo into black and white and at the same time, leaving certain object to stay color. How to do that? let's see.... :D It can create a cool effect to your photo.


Well, here is the steps:
1. Open your photo, for example I use this wallpaper.


2. Now select the object that you want to make it as a point of interest. This object will stay color while the outer selection area will turned into black and white (no color information).


3. Inverse your selection by press ctrl + shift + i, the selection will be inverted. Then press crtl + u to open hue and saturation option. Slide the saturation option to left so now you got the black and white color to the background.


4. And here is the results


This effect is one of the method to set the point of interest (POI) to your photo. You can get many interesting POI examples through google images.... :D
Lets try it.... :D
This tips is very suitable to mix with your project (video clips or short movie), especially when the object is doing a conversation through telephone. Very easy to do, all you need is adobe audition.

Before we start we had to determine the characteristic of telephone voice. Generally, the telephone voice is dominate by mid-range tone with frecuency between 500Hz - 3,5kHz.


The point is we need to limit or eliminate the normal full-range audio, cut the lower and higher frequency so the result is only the mid-range. You can use graphic equalizer to kill low and high tone, but it not effective because it can't remove those frequency completely. So, now we need a better tools to remove the unused frequency completely that tool is FFT filter.

Here is the steps:
1. Import your audio file to the workspace then select which part of audio file you want to apply the effects.


2. Open effects tab - filters - FFT filter


3. Here is FFT filter. The telephone effect is already available in preset. Choose telephone - voice mail preset. Hear the preview first to make sure the result as you expected. Click OK to apply the effect to selected audio file.


Not only create a telephone voice effects, FFT filter also can filter another frequency such as subwoofer only, high tone only, or simulate the mastering frequency.

You can choose one by one filter to hear the diffeent effect to your audio file.
Hope this tutorial is useful for you.

Solution to fix video from shaking

Posted by Andi Syahputra | 11:11 PM
This tutorial will give you a solution to fix shaky video using software. Shaky video will reduce the comfortable while we watch it and nobody wants that, so if the video you shoot not steady then this software is suitable for you.

I often use this software to stabilize the shaky video that I shoot from digital camera, the shake is reduced very well. The software is Prodad Mercalli. Mercalli available in plug-in version for adobe premiere, edius 6 or dedicated/stand alone software.


Just import your video and let the software analyze the shake, this may take a while according to your computer speed and video length. After analyze process finish, you can configure how mercalli will stabilize your shaky video. Set the most suitable result then apply to video, save it as a new stabilized video... :D

But you must know, how best the software fix the shaky video, it's better to fix it while you shoot than fix it via post processing editing... :D

Here is some tips for you to create a steady video, just like a pro:
1. Keep your hand relax and stay calm.
- Relaxing your body while hold the camera will make the camera position more stable, especially when you use small camera such as camcorder or digital camera.

2. Avoid zoom
- It's better to move closer to the object then using zoom. Using too deep zoom will make the shake more noticed. Of course this won't be a problem if you place the camera on a tripod.... :D

3. Using tripod
- This is the most effective solution, you better buying a tripod then buy the stabilization software.. :D You can use monopod also.

4. Don't hesitate to move
- Just move the camera freely and do not hesitate, especially for handheld use. Force the camera to stay static is harder if you're in handheld position.. :D

What is nofollow and dofollow links?

Posted by Andi Syahputra | 11:35 PM
For those who know well what is SEO then they already now what is nofollow and dofollow links. But if you still don't understand what the difference between nofollow and dofollow, read this post further... :D
Windows XP is one of the most reliable operating system from microsoft. However, windows XP had a performance issue after a long use. The cause could be more and more porgram installed, junks files, fragmented harddisk etc. Here is a tool for you to optimize windows XP performance in simple step.

Just download the software called bootvis :D
Bootvis will optimize your windows XP automatically in the next boot.
Download microsoft bootvis at softpedia.
The user interface of microsoft bootvis:


The first step to do is choose trace menu - next boot. Click reboot now and bootvis will restart your computer. When start-up, bootvis count the boot tme and analyze the boot files. Wait till bootvis user interface is show up and give you detail of your current system performance.

Second step, choose trace menu - optimize system. The computer will reboot again. At this star-up, bootvis will defragment your harddrive, moving the boot file to optimize its load, etc. Wait till this process complete and bootvis will open and show you the performance benchmark.

Now your windows XP should run faster than before.. :D

Install windows XP to virtual machine

Posted by Andi Syahputra | 10:24 PM
In the last post I already explain about what is virtual machine. Now in this tutorial I'll share to you how to install OS to it, for example I use windows XP professional here.... :D

I'm using VirtualBox so this tutorial is for virtual box user. I'm sure that it's not too different with other VM software such as VMware.

Here is the step by step tutorial:
- Before you can install the OS, first you need to configure a new virtual machine.

- While you're creating virtual machine, you can run nero in at the same time to copy windows XP installation disk into ISO boot CD.

- Click new virtual machine in virtualBox menu.


- Choose OS type, Operating system windows, version windows XP.

- Set the base memory (RAM for the VM)
Don't set it too high because it will cause your host OS laggy. 256MB is recommend.


- Next, create a virtual harddisk


- Choose harddisk size to fixed size or dynamically expanding storage, it's up to you


- Next, set the harddisk capacity. This option will appear if you choose fixed size in the previous configuration. You can also set where you want to store the VDI file.


- Click finish then the new virtual harddisk is created. How long this process is depending on your HDD speed and VDI size you set.


- After the process completed, your new VM should appear on the list now.
Just like real computer, when you run it first time, it will showing a fatal error (no OS).


virtual box BIOS


- To "insert" the windows XP disc, goto setting - storage. Choose add CD/DVD drive - choose disk. Locate your windows XP ISO then load it to virtual optical drive.


- Don't forget to change the boot priority to CD/DVD ROM first. You can goto setting - system - boot order to change it. Untick floppy drive option because we won't use it.. :D
Click OK to apply changes.

OK, for now you can start the VM and doing windows XP installation as usual.