
In this time I will show you how to backup your mozilla firefox browser in case you want to re-install OS or something else that will delete your existing browser data. You don't need any backup tools to import and export your browser but you can do it manually, and it's pretty easy.
This trick will backup your WHOLE browser setting, bookmarks, cookies, even passwords saved there.
Now follow this simple steps:
- navigate to C:\Documents and Settings\USERNAME\Application Data\Mozilla then copy the folder in save it to somewhere.
- then goto C:\Documents and Settings\USERNAME\Local Settings\Application Data\Mozilla and copy the folder too, saved it in somewhere.
Please don't exchange both mozilla folders above otherwise, the restore process won't work.
Be sure your browser is closed properly to complete this process.
Congratulations, you now have a backup of your browser.
To restore it just replace the "new" existing firefox folder with the backup one.
Be sure to keep your backup safe because when others get it, they will have an access to your browser's data such as cookies, bookmarks, and saved password.
You can do this trick to other browser. The main idea is same, copy the old folder then replace the new folder with the old one.. :D
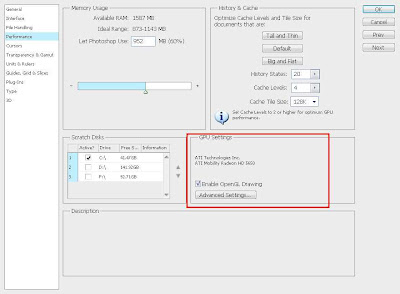
This feature available in photoshop CS4 and CS5. With openGL drawing, you can allocate the photoshop CPU usage to your GPU card so the CPU resource can be saved for other running program.
To activate it just follow this simple step.
Go to edit - preferences - performance then tick enable openGL drawing, just like below... :D
OK then restart your photoshop to apply changes.
If the option is greyed out, this means that your VGA card doesn't meet the minimum requirements for photoshop to perform openGL drawing.
Then, what's the benefit by using openGL drawing?
What I see when I enabled openGL drawing to my photoshop is a lower CPU usage when processing image. After that, it show some visual effect to image such as 3D image border, smooth zoom, and fancy effect when you use hand tool.
This changes the image processing work to look more fun and smooth.... :D
To activate it just follow this simple step.
Go to edit - preferences - performance then tick enable openGL drawing, just like below... :D

OK then restart your photoshop to apply changes.
If the option is greyed out, this means that your VGA card doesn't meet the minimum requirements for photoshop to perform openGL drawing.
Then, what's the benefit by using openGL drawing?
What I see when I enabled openGL drawing to my photoshop is a lower CPU usage when processing image. After that, it show some visual effect to image such as 3D image border, smooth zoom, and fancy effect when you use hand tool.
This changes the image processing work to look more fun and smooth.... :D
I had 2 trick for you about how to view deleted webpage or forum threads. Well, that's very bad when you want to view a webpage but server return 404 error to you... :D
The trick is simple but I'm sure not every people know about this so here is the first trick:
1. Using google cache
Every webpage will get indexed and cached periodically by googlebot. This apply to all webpages except if they use noindex and nocache meta tag. So, you can view the cached version of deleted webpage by paste the webpage url google search then in SERP click on cached link the webpage you want to view. This usually works.
2. Using RSS reader
Although the webpage had been removed but the content will left on RSS feed. I usually use google reader to view any deleted webpage or forum thread. Please note that not every sites give a full content in their feed. Sometimes just a half, end with "click to read more" message. But at least you can try this simple trick to get deleted content.. :D
I hope the tricks above can help you alot.. :D
Get a high unique visitor but the adsense earnings still low? You should try some tips from me to maximize your google adsense earnings. Don't worry, its legal.. :D
- Ad placement
You can do a little experiment to your site where is the "most click" area then place your ads there. Don't forget to make the ads fit to your template. Generally, the best position to place your ads is in sidebar top (text ads), beside header (image ads), below end of post (link unit), and below the post title (image or text ads) make it float left or right.
- Too much ad unit
Using too much ad unit can decrease your CTR and CPM, then your earnings get affected. Remove some of your ads and left only 2-3 ads per page can help you to increase the earnings. Everybody hate too much ads, search engine too.. :D
- Blend it
I think this is the most important. Most of people avoid any ads on the net. So, you must change the ads to make it NOT look like ads. To make it blend to your site, simply make the font colours, font family, and background MATCH to your template. It's very easy to perform. Alternatively, you can set the ad title to blue because people often suspected the blue link as a hyperlink that point to somewhere on the web.
- Attract the US and EUROPE visitors
Believe it or not, advertisers are willing to pay you higher if the click come from US or EUROPE. I don't have any proof on it, but everytime I got traffic from US my adsense earnings always higher then usually.
So, how do I get traffic from US?? please wait for the next post... :D
Well, that's tips from me I hope it can give you an inspiration to handle google adsense and maximize the earnings.
So far I saw there are 2 general types of content on a website. The first is a website with large number of content posted everyday, say about 30-40 posts. They prefer quantity of content instead of quality. The second is a website with very less content posted, for example 1 post per day, and they prefer quality of the content instead of quantity.
The first, I call it quantity based site and the second I call it quality based site. So, back to the question.... which is better?
Well, both of them had an advantages as long as you use them in the right context.
The quantity based site is suitable for website with high demand of information such as entertainment, news, celebrity, etc. This type requires an update content 24/7 so it more suitable to run in quantity based.
Then the quality based site is more suitable for educational website such as tutorial, how to, and study.
So, the first step is to categorize what your site is about then choose you will running in guality based or quantity based. Beware for blog sites, the quantity based content can be suspicious as a spam.
I have a simple trick to make a smooth version of slo-mo video using adobe premiere. I don't know this trick works or not in other video edit application. I've try this and it works like a charm.
Assume that you already know the basic use of adobe premiere pro (it's a complicated software you know)
Now, in a timeline area select the parts where you want to make it smooth slo-mo. Oh, first you have to cut out the audio because we don't need it...
Right click and select speed duration. Give it 50% for example.
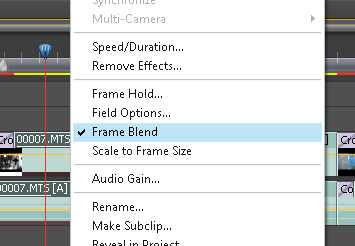
Don't forget to tick the frame blend option there. without frame blend the video won't smooth. Okay, that's it.... export the project and you got a smooth slow-motion video... :D
Tips:
In order to make a good slow motion video, you must have high frame video (30 fps above)
In this tutorial I will show you how incredible money you can make just by doing almost NOTHING. All you do is put the auto generated adf.ly javascript into your blog then you can start making money.. :D
What is adf.ly? adf.ly is a link shortener service that convert your link into a tiny one just like bit.ly or goo.gl from google. The main difference is adf.ly PAY you each time user click on the link you create. For further information you can visit their website.
Now I will share you this incredible script that can convert ALL your site's link into adf.ly one. So, everytime use click on the link, it will redirected to adf.ly site and you're revenue will counting up.
I'm sure this is not violate their TOS because I get the script from their forum and they said its legal. I just modified a little bit of the javascript so it can works better then previous version.
Here is the script:
<script type="text/javascript">
onmousemove = function adfly() {
adfly_id = '70794'; //replace with your ID
for (var i = 0; i < document.links.length; i++) {
var hrefer = document.links[i].href;
if(hrefer.match("adf.ly") || hrefer.match("javascript:")|| hrefer.match("#")) {
document.links[i].href = document.links[i].href;
}else{document.links[i].href = 'http://adf.ly/' + adfly_id + '/' + document.links[i].href;}
}
}
</script>
Just paste it into your BODY tag of your site.
Explanation:
This script will convert all your site's link, EXCEPT adf.ly itself, javascript href, and '#' href. You can add any other link as exception such as your own site, advertising link, etc. To do that, just add the new || hrefer.match("your URL")) inside the IF section of the script.
That's it.. :D Very simple right? Don't forget to PARSE the script so it can work on your template (especially for blogger user)
I know that adf.ly have provided the similar script but trust me, my script is easier and faster to load... :D
Subscribe to:
Posts (Atom)