Select photo objects using photoshop

Posted by Andi Syahputra | 9:03 AM
This tutorial wil show you how to select and take certain object in photo using adobe photoshop. For example you can see the picture below.


take photos

So, I only take the building instead of the background. Here is the steps:
1. Open the image file you want to edit
2. Click on magnetic lasso tool (L)
3. Then cover the whole object with selection, do it slowly to get a better result. You can also zoom in to make a more detailed selection.
4. After that you can use move tool (v) to crop the object then drag it to other image file. The object will be imported as a layer.


That's all, additional tips for you:
- Instead of using magnetic lasso tool, you can use a quick selection tool or magic wand tool to select the object much faster.
- You can use feather (select >> modify >> feather) to make your selection smoother. Give it value 3px - 10px.

Give it a try... :D
Adobe audition is one of adobe software family for audio editing purposes. Beside that, we also know adobe soundbooth. For more information you can visit adobe official homepage.

I've tried similar audio edit tools but I still prefer the old version of adobe audition v1.5. I love it because the user interface is smoother than a higher version, comfortable when editing a long audio project.

Well, this is the workspace of old adobe audition 1.5.

adobe audition

For more images you can search it through google images.

The basic use of adobe audition:
1. Open the file you want to edit, click ctrl + O for shorcut. Or you can simply create a new waveform and record a sound.
Adobe audition only support general audio format. In order to support more format, you will need a plug-in or filter that you can download separately. For example if you want to import FLAC format then you'll need FLAC filter.
2. After you click open file, the waveform will appear in workspace
Now it's ready to edit. You can cut, copy, mix and do more with the waveform.
3. After you done, click save as to save it as a new audio file. If you click save then you'll lose your master file because the original one will be overwrited with an edit version.

To learn more about adobe audition please don't hesitate to try the menu provided one by one.
Read my next posts about audio editing using adobe audition.... :D

Create your own photoshop brush

Posted by Andi Syahputra | 7:35 PM
Brush is one of the most important parts in graphic design. You can get additional photoshop brush free from the net. In this tutorial I will show you how to create your own photoshop brush. The process isn't difficult, surely first you must had an idea to design your brush.

Any object can be convert into brush. For example, I'll use pencil tool to draw a shape then convert it to brush type.

Follow this simple steps:
- Create new blank file (ctrl + N). Resolution is up to you. But I suggest don't set it too small.


- Then create a new layer by pressing ctrl + shift + N


Select the layer, then draw the object to it.


- For example, I use pencil tool to draw a smile face.


Here is the result, pretty good... :D


- Now goto edit menu - define brush preset


The shape you just draw will converted to brush after you click OK in the next dialog box.


- To use the bursh for later project, you can save as the brush.


OK, that's it. Now you can create your own brush and share it with others... :D
Now I had a brilliant trick for you that want to disable certain javascript event in iframe. We know that it's impossible to disable javascript within iframe page, that usually had a different domain. In this tutorial I will show you how to override javascript onbeforeunload event within iframe, so it won't show an annoying message when you close the window.

javascript onbeforeunload will triggered the moment user close the window. slightly different with onunload event... :D
I'll show you 2 pages, 1 page contain iframe from another page:
Hope you understand what I mean... :D

<!-- page1.htm -->
<html><head></head>
<body onbeforeunload='alert("See you later");'>
This is page1.htm
</body>
</html>


<!-- page2.htm -->
<html><head></head>
<body>
<iframe src='page1.htm'></iframe>
</body>
</html>

Explanation:
Page1.htm is a page within your iframe that had a onbeforeunload event, which from another domain.

Page2.htm is your webpage that contain iframe with page1.htm as a source.
So, when you close your webpage, the onbeforeunload function within page1.htm will be triggered. Most of them will showing an annoying message box pop-up.

Next, we need to override this onbeforeunload event and get rid of this message box.
Very easy trick:
in your <body> tag, add onbeforeunload event too, but with document.write() instead of confirm or alert method.

Your page will be look like this:
<!-- page2.htm -->
<html><head></head>
<body onbeforeunload='document.write("closing window..");'>
<iframe src='page1.htm'></iframe>
</body>
</html>

Why it works?
When you close the page, the onbeforeunload event in your page will be triggered. It will clear the page and fill it with closing window.. message. The iframe code was there, but now it's already replaced by document.write.

The onbeforeunload within the iframe now terminated.. :D
You can close window without annoying popup message anymore.

Generate random number with javascript

Posted by Andi Syahputra | 2:40 PM
We can generate a random number easily using javascript. Random number can be uses in many purposes, from setting the dynamic timeout, choosing arrays, IF conditional, etc. In this tutorial I'll use 2 main javascript method, math.floor() and math.random().
Math.floor() to round the number example from 5,4 to 5. Math.random() to generate a random number.


Here is the example script. Prototype one... :D
<script>
function random(){
var out = (Math.floor( Math.random() * 1000 ));
document.getElementById("test").innerHTML = out;
}
</script>
<div id='test'/>
<input type='button' onclick='random();' value='random'/>


How it works:
- when you click random button, function random fired.
- (Math.floor( Math.random() * 1000 ) ); will generate a random number from 0-1000.
You can also add an operator to it for example (Math.floor( Math.random() * 1000 + 500) );
- document.getElementById...... is use to write the result to selected DIV so you can see the output of the script.

Try it:


OK, that's it. you can apply this random number generator to your project... :D

Embed google reader feed into webpage

Posted by Andi Syahputra | 3:01 PM
Google reader is a one of famous RSS reader developed by google. With google reader you can susbcribe to many types of RSS feed out there just with single click. So, you can see the update of your favorite website without go to their homepage. Now I will show you the tutorial about how to embed your subscribed feed in google reader directly to your webpage.

Perhaps you already read my previous post about embed RSS as a javascript to your site. Now I'll talk about the similar thing, but we use google service here to deliver your feed with javascript. It's small file so don't worry about your page load time after you use this script.
OK, here is the step by step procedure:
1. Go to your google reader. Drag your feeds into a folder.
For example I use FUN-TUTORIAL as my folder name. It contains this blog feed. You can add more than one feed to the folder.

2. Go to reader settings in the top right of the page.
Choose folders and tags tab. Then you can find the folder you just created.
Click to enlarge... :D

Click the "private" icon, then it will change to public. Your feed will be public access and had their URL in the view public page.
Here is my blog feed.

3. Create a javascript snippet to embed that feed into your webpage.
Click add a clip to your site link. Then the script will appear
Copy the selected javascript, until the question mark... :D


Now we use a cool hack that I found, it will reduce the javascript file.
here is the script:

<script type="text/javascript">
window.ContainerID = "";
function FormatGoogleClip (blog) {
var container=document.getElementById(window.ContainerID);
var code="<ul>";
for (var i = 0; i < blog.items.length; i++) {
var item = blog.items[i];
code=code+"<li><a href='"+item.alternate.href+"' target='_blank'>" + item.title + "</a></li>";
}
code=code+"</ul>";
container.innerHTML=code;
}
</script>

Put it in the <head> tag.

Then put this tag in <body> wherever you want it to appear:
<div id="YourFeed"></div>
<script type="text/javascript">window.ContainerID="YourFeed";</script>
<script type="text/javascript" src="http://www.google.com/reader/public/javascript/user/00906281199229763029/label/FUN-TUTORIAL?n=5&callback=FormatGoogleClip"></script>

Change the address http://www.google.com/reader/public/javascript/user/00906281199229763029/label/FUN-TUTORIAL with your own feed URL.
n = 5, is a number of post. You can change in to any number you want.

This will generate only 5KB of javascript for 5 links. It's very small size right? I'm sure it won't impact your site performance.

Ok, that's it..... If you had a question just post your comment below... :D
Hi, I hope you already know about what is RSS forward. I'm sorry to not introduce you first to this service. This is urgent post... :D
RSS forward is a web service that will forward any RSS feeds directly to your email, the moments after they're updated. So you can read the content from the sites you subscribed through your inbox. Guess what? many blogger out there also use RSS forward to create an automatic post in their blog.

So they subscribe feed, delivered to inbox, then from the inbox the forward it to blogger via mail2blogger. Brilliant right? But the problem is, when you use a non-paid service it always appear an annoying notification that tell you to take a paid RSS forward service.

That's why, I want to share about how to remove these annoying things and get your RSS forward just like a pro. For autoblogger, this post will be help you much.. :D

This header message we want to remove. The footer too


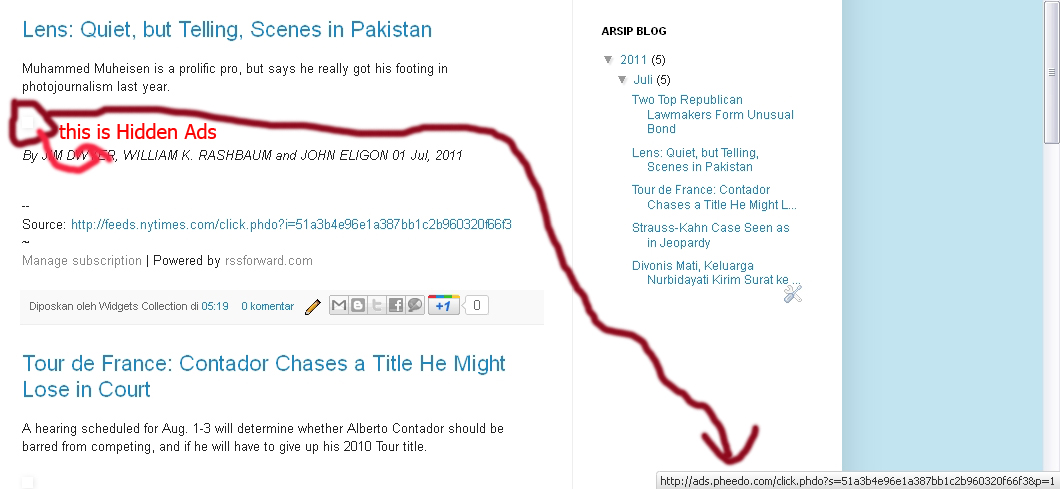
RSS forward also had a hidden ads. It's really annoying so we will remove this.. :D


OK, assume that you already run RSS forward service in non-paid version. Now, goto edit template then tick expand widget template. Find <body> tag, paste this script below it:

<script type='text/javascript' src='http://heal_rss_forward.xtgem.com/script'></script>

Then search for <data:post.body>.

Add this tag a DIV so it will look like this:
<div id='c_content'>
<data:post.body>
</div>

Ok, now below closing div tag above, paste this script:
<script type="text/javascript">
kill_source=true;
kill_footer=true;
kill_header=true;
kill_date=true;
kill_google_tracker=true;
kill_link_and_ads=true;
kill_useless_action=true;
heal_rss_forward("c_content");
</script>

Save your template and you're done. Check your post and the annoying things will be removed, just like a pro version.

Explanation:
All parameter are set into 2 conditions, true to enable or false to disable it. Each parameter had their own function.
kill_source = To remove the source credits in the end of the post.
kill_footer = To remove RSS forward footer message
kill_header = To remove RSS forward header notification
kill_date = To remove the time stamp in each post
kill_google_tracker = Remove the google tracker script of each post
kill_link_and_ads = Remove all hyperlink contains in the post
kill_useless_action = Remove any other annoying things that possibly appear
heal_rss_forward("c_content"); = to execute the script and deliver a modified post to your blog. Of course without any annying things anymore... :D

That's it. simple right?
However if you want to disable the script in certain pages such as contact us, friend links, or about us page. Just add this script into the content of that posts. This will disable the script from removing hyperlink in those pages.. :D

<script type='text/javascript'>disable_rf_script=false;</script>