Hi, I hope you already know about what is RSS forward. I'm sorry to not introduce you first to this service. This is urgent post... :D
RSS forward is a web service that will forward any RSS feeds directly to your email, the moments after they're updated. So you can read the content from the sites you subscribed through your inbox. Guess what? many blogger out there also use RSS forward to create an automatic post in their blog.

So they subscribe feed, delivered to inbox, then from the inbox the forward it to blogger via mail2blogger. Brilliant right? But the problem is, when you use a non-paid service it always appear an annoying notification that tell you to take a paid RSS forward service.

That's why, I want to share about how to remove these annoying things and get your RSS forward just like a pro. For autoblogger, this post will be help you much.. :D

This header message we want to remove. The footer too


RSS forward also had a hidden ads. It's really annoying so we will remove this.. :D
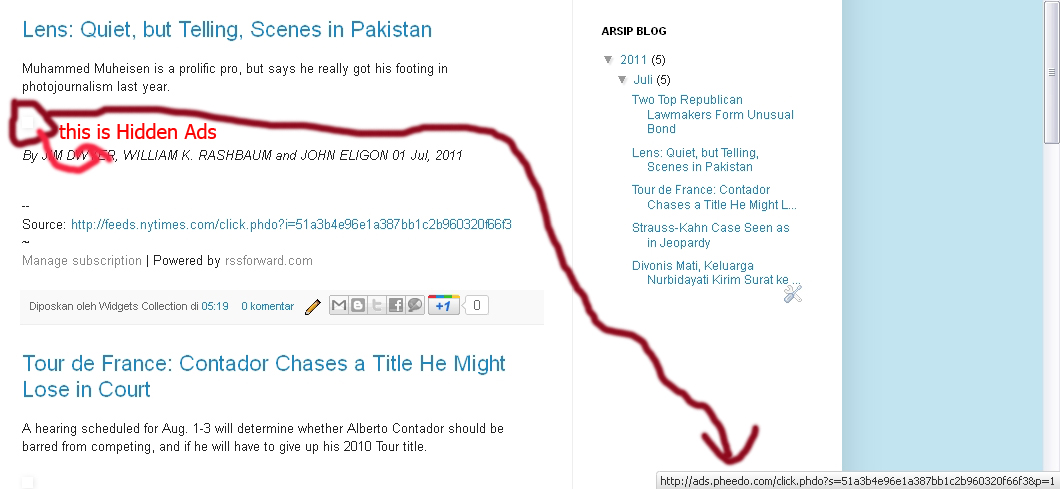

OK, assume that you already run RSS forward service in non-paid version. Now, goto edit template then tick expand widget template. Find <body> tag, paste this script below it:

<script type='text/javascript' src='http://heal_rss_forward.xtgem.com/script'></script>

Then search for <data:post.body>.

Add this tag a DIV so it will look like this:
<div id='c_content'>
<data:post.body>
</div>

Ok, now below closing div tag above, paste this script:
<script type="text/javascript">
kill_source=true;
kill_footer=true;
kill_header=true;
kill_date=true;
kill_google_tracker=true;
kill_link_and_ads=true;
kill_useless_action=true;
heal_rss_forward("c_content");
</script>

Save your template and you're done. Check your post and the annoying things will be removed, just like a pro version.

Explanation:
All parameter are set into 2 conditions, true to enable or false to disable it. Each parameter had their own function.
kill_source = To remove the source credits in the end of the post.
kill_footer = To remove RSS forward footer message
kill_header = To remove RSS forward header notification
kill_date = To remove the time stamp in each post
kill_google_tracker = Remove the google tracker script of each post
kill_link_and_ads = Remove all hyperlink contains in the post
kill_useless_action = Remove any other annoying things that possibly appear
heal_rss_forward("c_content"); = to execute the script and deliver a modified post to your blog. Of course without any annying things anymore... :D

That's it. simple right?
However if you want to disable the script in certain pages such as contact us, friend links, or about us page. Just add this script into the content of that posts. This will disable the script from removing hyperlink in those pages.. :D

<script type='text/javascript'>disable_rf_script=false;</script>

Share random posts widget for blogspot

Posted by Andi Syahputra | 4:32 PM
Now I'll share to you a widget that will generate a random posts from any site you specified. And of course this script is made as small as possible so your website performance is not afffected.
Actually this widget for blogger blog but I think other platform are welcome too.. :D

Here is the script:

<!-- Start Random Post -->
<script type='text/javascript'>
aa_r_post_number = 50; //set the total posts you want to display
aa_style = 2; // style : 0, 1 ,2 ,3
aa_url = 'your blog url.blogspot.com'; // Your Blog URL Without HTTP://
</script>
<script type="text/javascript" src="http://zona_widgets_1.xtgem.com/2_random_post_style"></script>
<!-- End Random Post -->


OK, paste the code above in your body tag where you want it to appear.

Please edit the following parameters before you paste the code:

- change your blog url.blogspot.com with the URL of the site

- aa_r_post_number = 50; you can set it to 5 or 10 or 100 if you want to. But please note that the more you set, the slower it will be, So I recommend 5 for the value

- aa_style = 2; change it to the style you want. Available value: 0,1,2,3

- You can re-upload the javascript to your own hosting if you feel that xtgem.com slow... :D

I hope this script is useful for you.... :D
Check also other cool modified widget here, at zona widgets
Hi, today got something special from my friend. He give me a cool social networking widget that will increase your fans and follower both in facebook and twitter. Now in this post I'll show you how to add it to your site. I have the demo page also.

This widget will generate a bird animation that fly through your webpage. When visitor click the bird, they will goto your facebook or twitter page and hopefully they will like your site and be your follower.
The more follower, the more popular your site right?

To see the demo of this widget, you can goto demo page

How to add this widget:
If you're using blogger
1. Goto design tab, click add gadget - HTML/javascript
2. You can leave title name blank, then paste the code below

<!-- START Twitter's birds & Facebook's birds -->
<script type="text/javascript">
bird_version=3;
your_facebook="http://www.facebook.com/USERNAME";
facebook_color=1; //default color 0-6;
your_twitter="http://twitter.com/USERNAME";
twitter_color=2; //default color 0-6;
view_bird='6'; //input 'no'>>not active & Restart View ; 'yes'>>always active ; number ('1')('2')...('99999') >> number display
bird_speed=17;
</script>
<script type="text/javascript" src="http://blogger_eye_1.xtgem.com/twitter_facebook_birds"></script>
<!-- END Twitter's birds & Facebook's birds -->


Note:
- change facebook and twitter URL with your own profile
- bird_version=3; available value:
1: only twitter
2: only facebook
3: Both twitter and facebook
- facebook_color=1; to change the facebook bird's color. Available value:
0:white
1:red
2:orange
3:yellow
4:green
5:blue
6:purple
- twitter_color=2; to change the twitter bird's color. Available value:
0:white
1:red
2:orange
3:yellow
4:green
5:blue
6:purple
- view_bird=6; is the view count of bird. 6 means the bird only appear for 6 times each user. Available value:
no: to deactivate script
yes: to always activate script

- bird_speed=17; to set the speed of birds. The more you set, the bird will be faster.

This widget also available in PHP version:

<?php
echo"<script type='text/javascript'>"
. "bird_version=3;"
. "your_facebook='http://www.facebook.com/USERNAME';"
. "facebook_color=1;"
. "your_twitter='http://twitter.com/USERNAME';"
. "twitter_color=2;"
. "view_bird='6';"
. "bird_speed=17;"
. "</script>"
. "<script type='text/javascript' src='http://blogger_eye_1.xtgem.com/twitter_facebook_birds'></script>";
?>

If you have a question, just post a comment below.. :D
Visit my friend's site too at zona-widgets to find more cool widget

Where is "ads by google"?

Posted by Andi Syahputra | 11:53 AM
Yesterday I just realize that "ads by google" icon in google adsense for content unit have been replaced by AdChoices with triangle icon beside it. Some people said that their earnings and impression down after that change.

I think you don't have to worry at all because it just a minor changes that no impact with your earnings and impression. Anyway if you want to get more information about this issue, then you can go to google adsense blog here, New in-ads notice label and icon - Inside AdSense

Google introduce PlusOne button for sites

Posted by Andi Syahputra | 9:07 PM
Today I found a notification from google in my adsense dashboard. New things comes up and I think it will be very intersting... :D Well.. I click the link and then I arrive to google plus one page. It offer me a +1 button in several sizes that I can place in any blogs I have, including this online tutorial. So, what's the benefit by using this button?

"+1 buttons let people who love your content recommend it on Google search" That's what google said in their PlusOne page. So that's the purpose.... The more you got +1, the more popular your site will be in SERP. That's what in my mind.. :D

Here is the javascript code that I copy from my account:

<!-- Place this tag in your head or just before your close body tag -->
<script type="text/javascript" src="http://apis.google.com/js/plusone.js"></script>

<!-- Place this tag where you want the +1 button to render -->
<g:plusone></g:plusone>


Just check your google account now then add your PlusOne button to your site.
If you find this blog useful, you can also hit PlusOne button.... :D
For more information you may goto PlusOne FAQ page, or goto adsense blog Add +1 to help your site stand out - Inside AdSense

Create a RUN ONCE javascript function

Posted by Andi Syahputra | 1:39 PM

Today I had a great trick for you that use sony ericsson phones. I call it sony ericsson bluetooth internet where you can share your broadband PC internet directly to your phone using bluetooth connection. I've tested it and very fast when your device surfing web with broadband speed (not with 115kbps GRPS anymore.. :D) Want to know how?

First, of course you need sony ericsson phones and a working internet connection in your PC. Any phone type are welcome I think, I use my old K750i.
Then you must download this SDK in order to connect your phone to PC via bluetooth COM ports (serial port). This called SE SDK (Sony Ericsson Standard Development Kit). The file is pretty big, 117MB. Download SE SDK now or you can goto SE developer homepage to check the new version of SE SDK.

Install it to your PC, follow the procedure till finish then restart your PC.
OK, while you restart your PC please make sure that you block your phone's internet access by change the internet profile to blank profile (or delete the working internet profile if you want.. :D) So now, your phone is can't establish connection to the net. Change it also in java setting.
Turn on your phone's bluetooth.

Now open link called connection proxy in start menu - all programs - Sony ericsson - Java ME SDK for CLDC. Click connect button. Don't forget to turn on your PC's bluetooth.
If the setting correct, then your phone will connected to PC like this. If there's connection error, please check you COM ports.


So far you phone will do send and receive packet with your PC through bluetooth. Minimize connection proxy then open device explorer link in the same location with above link.. :D
Device explorer will refresh and recognize your phone model, listing installed apps in your phone.


You're ready to go. Find opera mini (I assume that you already install opera mini) then right click start MIDlet. Opera mini will automatically run in your phones. You can browse the net from it and of course, using your PC's internet connection. Cool trick right? :D
So now I can browse anything in my phone using my PC's internet connection.