
Recently I found a cool tools that will encode your javascript using eval packer function. It make your script become hard to read. To access this eval packer you can go to dean edwards webpage. Paste your script there then choose base 62 encode and click pack button.
For example this is example original javascript:
function test(){
var a = 34;
alert("test");
document.write(a);
}
Packed script will become like this:
eval(function(p,a,c,k,e,r){e=String;if(!''.replace(/^/,String)){while(c--)r[c]=k[c]||c;k=[function(e){return r[e]}];e=function(){return'\\w+'};c=1};while(c--)if(k[c])p=p.replace(new RegExp('\\b'+e(c)+'\\b','g'),k[c]);return p}('2 0(){3 1=4;5("0");6.7(1)}',8,8,'test|a|function|var|34|alert|document|write'.split('|'),0,{}))
Nothing different in script execution, just become hard to read... :D
Just for suggestion, don't pack a large script because the script size will become larger. Just pack important small script.. :D
Then, how do I decode it if I found similar script? Ok, wait for the next post.. :D
Hope this useful
I have a trick for you to manage your webpage's javascript for faster page loading. Usually, browser loading javascript sequentially that cause it must wait for javascript to load complete, one by one.
This technique will load javascript while the webpage load, is called asynchronous javascript a.k.a non-blocking javascript. Now, I'll show you how to load your javascript as asynchronous one... :D
Non blocking script technique will use javascript to load javascript. Seems confusing?
This is how we embed javascript as usual:
<script src='javascript.js'></script>
Now here is the non-blocking version. You can put it into <head> or <body> tag:
<script type='text/javascript'>
(function(){var s=document.createElement('script');s.async="async";s.type="text/javascript";s.src='javascript.js';var h=document.getElementsByTagName('script')[0];h.parentNode.insertBefore(s,h);})();
</script>
So, whether the javascript is not loading (timeout) then the webpage and other element will still loading without have to wait that script to load complete.
To compare both techniques, you can use simple javascript alert("test");
Normal version: When alert function fired, the webpage won't load complete until we click OK to close alert box
Non-blocking version: The webpage will continue loading although the alert function fired and alert box still appear.
This technique will load javascript while the webpage load, is called asynchronous javascript a.k.a non-blocking javascript. Now, I'll show you how to load your javascript as asynchronous one... :D
Non blocking script technique will use javascript to load javascript. Seems confusing?
This is how we embed javascript as usual:
<script src='javascript.js'></script>
Now here is the non-blocking version. You can put it into <head> or <body> tag:
<script type='text/javascript'>
(function(){var s=document.createElement('script');s.async="async";s.type="text/javascript";s.src='javascript.js';var h=document.getElementsByTagName('script')[0];h.parentNode.insertBefore(s,h);})();
</script>
So, whether the javascript is not loading (timeout) then the webpage and other element will still loading without have to wait that script to load complete.
To compare both techniques, you can use simple javascript alert("test");
Normal version: When alert function fired, the webpage won't load complete until we click OK to close alert box
Non-blocking version: The webpage will continue loading although the alert function fired and alert box still appear.
Stereographic photo is also known as "little planet" photos. For more information about this you can visit Stereographic projection in wikipedia. Now I'll show you how to create a simple stereographic photo by using photoshop.
The best photo to create stereographic effect is a panoramic photo. Now open your photoshop and choose the image you want to make it stereographic look. For example I use this panoramic photo:

It's really wide actually
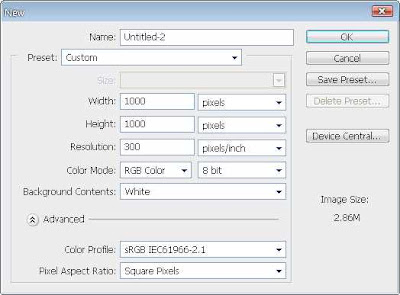
Open the file in photoshop then create a new file with square pixel. For example I use 1000x1000 pixel
The best photo to create stereographic effect is a panoramic photo. Now open your photoshop and choose the image you want to make it stereographic look. For example I use this panoramic photo:

It's really wide actually
Open the file in photoshop then create a new file with square pixel. For example I use 1000x1000 pixel

Now insert that wide photo to the new file by dragging it using move tool. Stretch the panorama and fill the whole area, like this

Rotate the photo

Then open filter - distort - polar coordinates and choose rectangular to polar option.
Ok, there's our little planet.. :D

Can you see the white line in the photos? now use clone stamp tool to fix it.
Alt + Click beside the white line
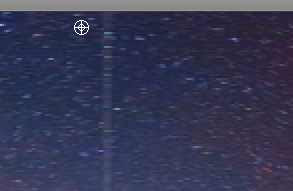
Then drag the mouse through the white line.. :D
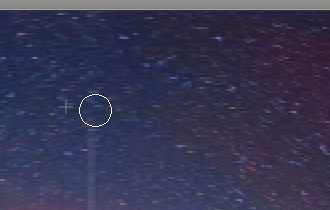
With 180 degrees of rotating, here is our little planet.


Rotate the photo

Then open filter - distort - polar coordinates and choose rectangular to polar option.
Ok, there's our little planet.. :D

Can you see the white line in the photos? now use clone stamp tool to fix it.
Alt + Click beside the white line

Then drag the mouse through the white line.. :D

With 180 degrees of rotating, here is our little planet.

I hope this will be useful for you... :D
I just found one cool tools that will convert headline from RSS feed directly to javascript version so you can embed it into your webpage. Usually you need JSON to fetch the feed then parse it as javascript. But JSON create a bunch of big file that may slow the webpage.
You can goto RSS to javascript homepage then create your own javascript. It's totally free. All you need is just paste the feed url then generate javascript after you set your own setting there. Easy to use and faster than JSON because it not create a big file like JSON does.... :D
Anyway, if you more prefer JSON than RSS to javasript, here is RSS fetch in JSON version:
<script type="text/javascript">
function recentpostslist(json) {
document.write('<ul>');
for (var i = 0; i < json.feed.entry.length; i++)
{
for (var j = 0; j < json.feed.entry[i].link.length; j++) {
if (json.feed.entry[i].link[j].rel == 'alternate') {
break;
}
}
var entryUrl = "'" + json.feed.entry[i].link[j].href + "'";//bs
var entryTitle = json.feed.entry[i].title.$t;
var item = "<li>" + "<a href="+ entryUrl + '" target="_blank">' + entryTitle + "</a>";
document.write(item);
}
document.write('</li>');
}
document.write('</ul>');
</script>
<script src="http://fun-tutorial.blogspot.com/feeds/posts/default?max-results=10&alt=json-in-script&callback=recentpostslist"></script>
Change the feed address as you want.
Very simple right? :D
You can goto RSS to javascript homepage then create your own javascript. It's totally free. All you need is just paste the feed url then generate javascript after you set your own setting there. Easy to use and faster than JSON because it not create a big file like JSON does.... :D
Anyway, if you more prefer JSON than RSS to javasript, here is RSS fetch in JSON version:
<script type="text/javascript">
function recentpostslist(json) {
document.write('<ul>');
for (var i = 0; i < json.feed.entry.length; i++)
{
for (var j = 0; j < json.feed.entry[i].link.length; j++) {
if (json.feed.entry[i].link[j].rel == 'alternate') {
break;
}
}
var entryUrl = "'" + json.feed.entry[i].link[j].href + "'";//bs
var entryTitle = json.feed.entry[i].title.$t;
var item = "<li>" + "<a href="+ entryUrl + '" target="_blank">' + entryTitle + "</a>";
document.write(item);
}
document.write('</li>');
}
document.write('</ul>');
</script>
<script src="http://fun-tutorial.blogspot.com/feeds/posts/default?max-results=10&alt=json-in-script&callback=recentpostslist"></script>
Change the feed address as you want.
Very simple right? :D
In this time I will show you how to backup your mozilla firefox browser in case you want to re-install OS or something else that will delete your existing browser data. You don't need any backup tools to import and export your browser but you can do it manually, and it's pretty easy.
This trick will backup your WHOLE browser setting, bookmarks, cookies, even passwords saved there.
Now follow this simple steps:
- navigate to C:\Documents and Settings\USERNAME\Application Data\Mozilla then copy the folder in save it to somewhere.
- then goto C:\Documents and Settings\USERNAME\Local Settings\Application Data\Mozilla and copy the folder too, saved it in somewhere.
Please don't exchange both mozilla folders above otherwise, the restore process won't work.
Be sure your browser is closed properly to complete this process.
Congratulations, you now have a backup of your browser.
To restore it just replace the "new" existing firefox folder with the backup one.
Be sure to keep your backup safe because when others get it, they will have an access to your browser's data such as cookies, bookmarks, and saved password.
You can do this trick to other browser. The main idea is same, copy the old folder then replace the new folder with the old one.. :D
This trick will backup your WHOLE browser setting, bookmarks, cookies, even passwords saved there.
Now follow this simple steps:
- navigate to C:\Documents and Settings\USERNAME\Application Data\Mozilla then copy the folder in save it to somewhere.
- then goto C:\Documents and Settings\USERNAME\Local Settings\Application Data\Mozilla and copy the folder too, saved it in somewhere.
Please don't exchange both mozilla folders above otherwise, the restore process won't work.
Be sure your browser is closed properly to complete this process.
Congratulations, you now have a backup of your browser.
To restore it just replace the "new" existing firefox folder with the backup one.
Be sure to keep your backup safe because when others get it, they will have an access to your browser's data such as cookies, bookmarks, and saved password.
You can do this trick to other browser. The main idea is same, copy the old folder then replace the new folder with the old one.. :D
This feature available in photoshop CS4 and CS5. With openGL drawing, you can allocate the photoshop CPU usage to your GPU card so the CPU resource can be saved for other running program.
To activate it just follow this simple step.
Go to edit - preferences - performance then tick enable openGL drawing, just like below... :D
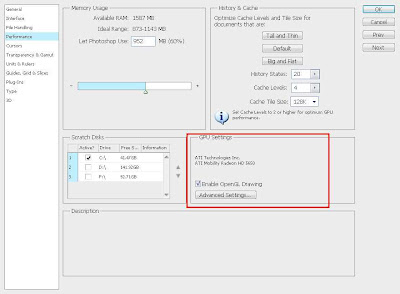
OK then restart your photoshop to apply changes.
If the option is greyed out, this means that your VGA card doesn't meet the minimum requirements for photoshop to perform openGL drawing.
Then, what's the benefit by using openGL drawing?
What I see when I enabled openGL drawing to my photoshop is a lower CPU usage when processing image. After that, it show some visual effect to image such as 3D image border, smooth zoom, and fancy effect when you use hand tool.
This changes the image processing work to look more fun and smooth.... :D
To activate it just follow this simple step.
Go to edit - preferences - performance then tick enable openGL drawing, just like below... :D

OK then restart your photoshop to apply changes.
If the option is greyed out, this means that your VGA card doesn't meet the minimum requirements for photoshop to perform openGL drawing.
Then, what's the benefit by using openGL drawing?
What I see when I enabled openGL drawing to my photoshop is a lower CPU usage when processing image. After that, it show some visual effect to image such as 3D image border, smooth zoom, and fancy effect when you use hand tool.
This changes the image processing work to look more fun and smooth.... :D
I had 2 trick for you about how to view deleted webpage or forum threads. Well, that's very bad when you want to view a webpage but server return 404 error to you... :D
The trick is simple but I'm sure not every people know about this so here is the first trick:
1. Using google cache
Every webpage will get indexed and cached periodically by googlebot. This apply to all webpages except if they use noindex and nocache meta tag. So, you can view the cached version of deleted webpage by paste the webpage url google search then in SERP click on cached link the webpage you want to view. This usually works.

2. Using RSS reader
Although the webpage had been removed but the content will left on RSS feed. I usually use google reader to view any deleted webpage or forum thread. Please note that not every sites give a full content in their feed. Sometimes just a half, end with "click to read more" message. But at least you can try this simple trick to get deleted content.. :D
I hope the tricks above can help you alot.. :D
The trick is simple but I'm sure not every people know about this so here is the first trick:
1. Using google cache
Every webpage will get indexed and cached periodically by googlebot. This apply to all webpages except if they use noindex and nocache meta tag. So, you can view the cached version of deleted webpage by paste the webpage url google search then in SERP click on cached link the webpage you want to view. This usually works.
2. Using RSS reader
Although the webpage had been removed but the content will left on RSS feed. I usually use google reader to view any deleted webpage or forum thread. Please note that not every sites give a full content in their feed. Sometimes just a half, end with "click to read more" message. But at least you can try this simple trick to get deleted content.. :D
I hope the tricks above can help you alot.. :D
Subscribe to:
Posts (Atom)