Actually I had this problem for a long time in my notebook. While you use keyboard the touchpad can't run, otherwise too. It's annoying when you play a shooting game because the game character can't shoot and run at the same time... :D

First I think this is hardware issue, then I try to looking for the solution about this and fortunately, I found the solution. The default settings of touchpad driver that cause this so you only need to set the touchpad sensitivity to higher value.

Here is the screenshot of my touchpad settings. My notebook use synaptics touchpad. Most of the notebook today use the same hardware I think. So, all you need is open the driver settings, navigate to pointing menu - sensitivity - palmcheck. Change the setting to minimum, which means that you touchpad respons area is wider (more sensitive).


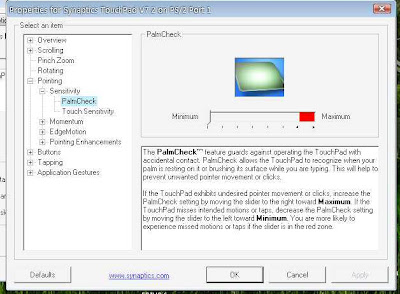
Click OK to apply changes and now test it. Type a word using keyboard while you use touchpad to move the cursor. It works... :D
If your touchpad hardware isn't from synaptics, just find the settings yourself and set the palmcheck to the minimum, that's the solution...
Read More - Fix touchpad and keyboard can't run at a same time

Create karaoke song, method 2

Posted by Andi Syahputra | 11:29 PM
I've share the same topic in my prevoius post about how to create a karaoke song, but now I had another method (a better method) how to create a good quality of the song in karaoke version.

What you need is a 2 version of song, first is normal version (with vocal) and second is instrumental version (no vocal). So both of this version will be joined together in adobe audition, to each channel, left and right. Usually the recording studio release an official instrumental version of the song. You can search it trough youtube for example... :D
If you didn't find instrumental version, you can try to remove the song vocal by yourself.

Ok, here is the tutorial:
1. First import the 2 both song version to audition workspace.


2. Create a new waveform (ctrl + N)


3. Goto your instrumental song, select only one channel, left or right, then copy it.
To select one channel only, you can double click the upper / lower of the workspace.


4. Go to the new waveform you created, then select just one channel too. After that, paste it. So, now it will be like this.... :D


5. Do the same with the vocal version. Select other channel, then paste it to the new waveform.


6. So, your new waveform now contain both version of the song each channel.
Usually the song timing in both channel isn't same. To sync both channel, use delay effects.. :D


Delay feature will set the timing of each channel. Set it until both channel is synchronized.


There's no exact settings here because it depend on your waveform.


After you set it, click OK to apply the delay.
That's it, you had the karaoke version song right now.
Read More - Create karaoke song, method 2
You love timelapse photography so much but don't have a capable camera to perform it? Don't worry, with this small java application it will turn your mobile phone to act like timelapse camera. You can capture photo automatically with interval that you can set.
Read More - Create timelapse photography with mobile phone
I've got this problem several days ago. So, If any of you had the same problem perhaps this tips could help you to make your windows explorer can drag and drop files again.

Drag and drop is a very often used windows explorer feature, you can move files to foder, copy just by drag and drop. I got this issue when I'm updating my windows XP SP2 to SP3. So, I had to cut and paste when I want to move files, and that's a little annoying.. :D

After I search everywhere, I got a simple fix to make the drag and drop feature back to work.
You just open regedit, then navigate to HKEY_CURRENT_USER/SOFTWARE/Microsoft/Windows/CurrentVersion/Internet Settings/Zones/4 path, find the DWORD key named 180D, set the value to 0. If you can't find such key, create a new DWORD key with name 180D and set the value to 0.

Hope this solve your problem... :D
Read More - Simple fix windows XP cannot drag and drop files

Remove red-eye using photoshop

Posted by Andi Syahputra | 11:32 PM
Red-eye in a photo usually cause by reflection of the camera flash, making the eye looks like a devil.. :D. Here is a simple trick to remove red-eye using photoshop.

Photoshop had a special red-eye removal feature that you can use:

1. First open your photo


2. Now click red-eye tool (J)


Set the red-eye amount, locate below the photoshop menu.


3. Click the red-eye area, then the red-eye will be removed.


4. Final result.. :D
Read More - Remove red-eye using photoshop

Create fisheye effect to photo

Posted by Andi Syahputra | 11:31 PM
Fisheye is one of the style in photography that makes a photo look like the point of view from fish perspective (distorted and wide angle). In order to get this kind of photo, you need a special lens called fisheye lens. In this tutorial I won't use fisheye lens but using photoshop to create a fisheye effect to the photo.

Before going to tutorial, here is the example of the REAL fisheye photo.


Another version


Here I had 2 techniques to create a fisheye effecr using photoshop, I'll tell you one by one. You can use photo with any resolution.
Here is the method 1:
1. Open your photo then press ctrl + A to select all area.


2. Choose edit menu - transform - wrap


3. Choose fisheye preset. You can customize the blend value Pilih preset fisheye.


4. Click OK and here is the result.


Here is the method 2:
1. Open your photo, make an eliptical selection to the main object.
Change the photo into layer by double click the background in the layers tab.


2. Inverse selection by pressing ctrl + shift + I
Then press delete button to remove background.


3. Press ctrl + shift + I again to select the main object. Then goto filter menu - distort - spherize


4. Here is the fisheye effects will be generated. Slide the amount till you got the optimum fisheye effect. Click OK to apply effect


5. Now you got the "fake" fisheye photo.
Next, you can fill the background to make your photo looks nice.
Black background, just like the real fisheye photo.. :D


Also you can add a gradient to it.. :D


So, which method is better? it's up to you.. :D
Read More - Create fisheye effect to photo

Photoshop tips - create a photo frame

Posted by Andi Syahputra | 11:43 PM
Actually there's so many photo frame out there that you can download and use it immediately. But how to create your own photo frame? Here is the tutorial, creating a minimalist frame for your photo.

1. Open your photo

2. In order to make the photo editable and add frame to it, you must change the photo into a layer first. Double click background (as the screenshot below) then click OK to change it into a layer.


3. Double click again to layer then appear layer style.

4. Actually the frame I want to create here is just using inner stroke then apply emboss and gradient through it. So, tick stroke option then set the stroke posititon into inside instead of outside. Set also the thickness of the frame, for example 10px.


5. Not only with color, you can fill the stroke with pattern oor gradient.


Here is example by using gradient. You can customize your own gradient and apply it to the frame.


6. For additional effect, add bevel and emboss to make the frame looks better. Click OK to apply effect to your photo.
Read More - Photoshop tips - create a photo frame