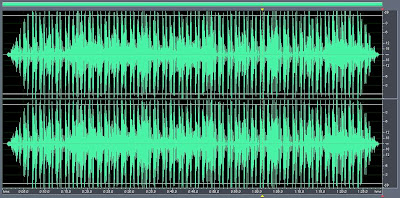
You had a good song but unfortunately it's in karaoke version (left instrument, right vocal channel)? Here is a very easy audio editing tutorial that will convert your karaoke song into stereo version so you can more enjoy it.
This tutorial using adobe audition so make sure that you already install the sotware. At first, import your song file into audition workspace, here I use an old Adobe Audition 1.5.
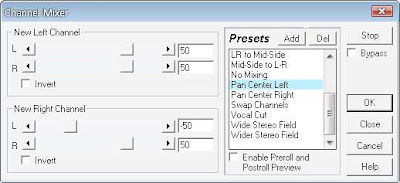
- Navigate to effects tab - amplify - channel mixer.
- Here is channel mixer menu.
There's 2 options. If the vocal channel is in right, then you choose pan center left just like above.
If the vocal channel is in left, then choose pan center right.
- Click OK to apply changes
You karaoke song should now become a normally stereo channel. You can also set the new left and right channel independently to get a better results.
Tips: You can always hit preview button to make sure the song's channel is properly aligned as stereo version.
Good luck, if you have any uestion, please give me a comment :D
In this post I'll share you a brilliant trick to place the ads inside of your post automatically by using javascript. By placing your ads inside the blog post then hopefully the chance of ads is viewed is greater than any place of your site and will increase the chance it clicked.
Here I show you the google adsense heat map that explain the most strategic place to put your ads. Based on the heat map, this javascript will place your ads inside the primary content.. :D

I'm not the creator of this javascript, I just googled it and modify to make it works well. The prototype isn't look well so I edit the script and make it better :D
I'm sorry because I forgot the source since I found it long time ago.
I also add a random features to it, make the the script could change the ads position while inside the blog post. So, when page is reload, you'll notice the ads position is changed.
Well... here is the script I make it for blogger version. You can also adapt it to other platform since the algorithm is simple :D
How to install:
- open edit HTML in your blog, tick expand widget template.
- find data:post.body
- change data:post.body with the main script
<!-- script shared and modified by blog-tutorial-menarik.blogspot.com -->
<div expr:id='"aim1" + data:post.id'/>
<b:if cond='data:blog.pageType == "item"'>
//YOUR AD CODE
</b:if>
<div expr:id='"aim2" + data:post.id'>
<data:post.body/>
</div>
<b:if cond='data:blog.pageType == "item"'>
<script type='text/javascript'>
var a=Math.floor(Math.random()*3)+1;
var obj0=document.getElementById("aim1<data:post.id/>");
var obj1=document.getElementById("aim2<data:post.id/>");
var s=obj1.innerHTML;
var t=s.substr(0,s.length/a);
var r=t.lastIndexOf("<br>");
if(r>0) {obj0.innerHTML=s.substr(0,r);obj1.innerHTML=s.substr(r);}
</script>
</b:if>
<!-- Please do not remove the copyright line -->
- Save template
Easy right?
Is this legal? I think it's legal because we don't modify the ad code at all. However, if you not sure, you can ask them :D
For the live demo you can see it at my other blog
Hopefully this trick is useful for you. If you developed a better version of this script, don't hesitate to share it here.
Here I show you the google adsense heat map that explain the most strategic place to put your ads. Based on the heat map, this javascript will place your ads inside the primary content.. :D

I'm not the creator of this javascript, I just googled it and modify to make it works well. The prototype isn't look well so I edit the script and make it better :D
I'm sorry because I forgot the source since I found it long time ago.
I also add a random features to it, make the the script could change the ads position while inside the blog post. So, when page is reload, you'll notice the ads position is changed.
Well... here is the script I make it for blogger version. You can also adapt it to other platform since the algorithm is simple :D
How to install:
- open edit HTML in your blog, tick expand widget template.
- find data:post.body
- change data:post.body with the main script
<!-- script shared and modified by blog-tutorial-menarik.blogspot.com -->
<div expr:id='"aim1" + data:post.id'/>
<b:if cond='data:blog.pageType == "item"'>
//YOUR AD CODE
</b:if>
<div expr:id='"aim2" + data:post.id'>
<data:post.body/>
</div>
<b:if cond='data:blog.pageType == "item"'>
<script type='text/javascript'>
var a=Math.floor(Math.random()*3)+1;
var obj0=document.getElementById("aim1<data:post.id/>");
var obj1=document.getElementById("aim2<data:post.id/>");
var s=obj1.innerHTML;
var t=s.substr(0,s.length/a);
var r=t.lastIndexOf("<br>");
if(r>0) {obj0.innerHTML=s.substr(0,r);obj1.innerHTML=s.substr(r);}
</script>
</b:if>
<!-- Please do not remove the copyright line -->
- Save template
Easy right?
Is this legal? I think it's legal because we don't modify the ad code at all. However, if you not sure, you can ask them :D
For the live demo you can see it at my other blog
Hopefully this trick is useful for you. If you developed a better version of this script, don't hesitate to share it here.
I noticed that since google reader change the user interface, "make public" option in folder and tags is missing. I don't know they removed it intentionally or they just "forget" to add it back to the new UI... :D You can see my previous post about embed google reader feed to website and make public option still there.
After searching through google help forum, many people talk that it's a bug. Some of their suggestion is using some kind of google chrome extension to reverse back google reader into its old UI while others said to choose another RSS feed service :D. Further reading, then I found a simple solution to get your feed or label accessible to public. So far I tried and it works.
To resolve the public feed issue in the new google reader interface, you can simply create a bundle. For example I use a label called MONITOR
Select your label, then choose create bundle. In the next page you can add or remove the RSS feed. Click save to create a new bundle.

Here is the bundle I created, you can see "add a link" there, that link will work like a public feed, which is accessible to others :D

I've tried that and it work fine..... :D
After searching through google help forum, many people talk that it's a bug. Some of their suggestion is using some kind of google chrome extension to reverse back google reader into its old UI while others said to choose another RSS feed service :D. Further reading, then I found a simple solution to get your feed or label accessible to public. So far I tried and it works.
To resolve the public feed issue in the new google reader interface, you can simply create a bundle. For example I use a label called MONITOR
Select your label, then choose create bundle. In the next page you can add or remove the RSS feed. Click save to create a new bundle.

Here is the bundle I created, you can see "add a link" there, that link will work like a public feed, which is accessible to others :D

I've tried that and it work fine..... :D
BjQuery widget that I mention in previous post also had a google translate and alexa rank feature. You can add it easily with one line code. Google translate widget will show you 12 option of language you can translate to. Once you click one of it, you will automatically redirected to the translation page. Alexa rank widget will show the rank of any site you decide.
Google translate widget only had 1 style, while alexa rank had 3 style that you can choose.
Here is the script to add google translate tools to your site:
- Please make sure you already add BjQuery main script below the body tag
<script src="http://bjquery.xtgem.com/v_1_19" type="text/javascript"></script>
- add script jb_g_translate(number button in 1 row, "your site's language");
for example:
<script>
jb_g_translate(6,"en");
</script>
- place it inside body tag, wherever you want it to appear.. :D
- save your template
How to add alexa rank widget? here is the steps:
- BjQuery main JS must exist in your body tag :D
- add script jb_alexa("your site (without http:// prefix", style(1,2,or 3));
Example:
<script>
jb_alexa("www.google.com",1);
</script>
- Place it where you want it to appear then save your template.
Have fun with BjQuery alexa and google translate widget :D
This post is one of the explanation of BjQuery feature. I'm sorry if the title make you confuse :D
Actually it called a link style features, that will change the mouse pointer when pointing a hyperlink.
This widget will make ALL links in your post totally blending with the text. So when you point a hyperlink, the mouse pointer won't change... :D
You can see the comparison below.
Normal link (before effect):
ONLINE TUTORIAL
After aplied link style:
ONLINE TUTORIAL
Follow this step to add link style effect to your site. Here's example for blogger blog:
- Open edit HTML, then tick expand widget template
- add this script below the <body> tag
<script src="http://bjquery.xtgem.com/v_1_19" type="text/javascript"></script>
- Find <data:post.body/>. Cover it with a div, for example I named the div as c_content
<div id='c_content'>
<data:post.body/>
</div>
- Below that div, add the link style script:
Script format - jb_link_style("link color","underline","cursor type","c_content");
Example:
<script>
jb_link_style("black","true","true","c_content");
</script>
- save the template
Note:
- black = set the link color to black. You can change it with any color you want
- if underline is set to true, it will remove underline in hyperlink else (false), not remove underline
- if cursor type true, the hyperlik cursor will change to text. Otherwise (false), the cursor isn't change
OK, that's it. Stay tune for the next fun tutorial post.......
Still about BjQuery, now I'll explain about how to use text to link features. This widget will automatically change the targeted word into a hyperlink. You can define many word to make it into hyperlink.
Very useful for you to build an internal link to your site. Besides text to link, there are some features that similar such as bold to link, underline to link, and italic to link. You can use it together with text to link.
- bold to link = change all BOLD word into a link
- italic to link = change all ITALIC word into a link
- underline to link = change all UNDERLINE word into a link
Well, here's the instruction manual. Assume that you use blogger:
- Open edit HTML, then tick expand widget template
- add this script below the <body> tag
<script src="http://bjquery.xtgem.com/v_1_19" type="text/javascript"></script>
- Find <data:post.body/>. Cover it with a div, for example I named the div as c_content
<div id='c_content'>
<data:post.body/>
</div>
- Below that div, add the text to link script:
<script>
jb_bold_to_link("URL","c_content");//add this lineif you want to activate bold to link feature
jb_italic_to_link("URL","c_content");
jb_underline_to_link("URL","c_content");
jb_text_to_link("WORD","URL","c_content");
jb_text_to_link("WORD2","URL","c_content");
</script>
- save the template
Note:
- URL refer to the link you want to add.
For example if you set the URL into http://google.com, then the hyperlink become http://google.com
- WORD dan WORD2. Change it with the word you want to make it a link.
For example if you change the word to ADMIN. so if the word ADMIN exist on the post, it will automatically changed into ADMIN word with URL you specify :D You can add more word and specify the URL one by one.
Try it, very cool widget..
If you had any question you can comment below.... :D
Yesterday I've post about what is BjQuery. Now, I will share the tutorial about how to use the first BjQuery features, strong keyword for SEO. In SEO world, <strong> usually use more often then bold <b> tag. The result is same, but many SEO experts suggest to use <strong> than <b>.
Main purpose
This strong keyword widget will automatically add your keyword with a <strong> tag.
Here is how to add it to your site. I explain it in blogger version:
- Open edit HTML, then tick expand widget template
- add this script below the <body> tag
<script src="http://bjquery.xtgem.com/v_1_19" type="text/javascript"></script>
- Find <data:post.body/>. Cover it with a div, for example I named the div as c_content
<div id='c_content'>
<data:post.body/>
</div>
- Below that div, add the strong keyword script:
<script>
jb_strong_keyword("c_content");
</script>
- save the template
You're done :D
If you have any comment, please let me know.
BjQuery widget? sounds like javascript jquery, but actually this widget had a big difference with jquery :D I don't know why my friend named it like that. He is the creator of this widget, I'm here just to write a short review about his widget. You can contact him at zona widgets.
This widget only contain 1 javascript file that you can easily host it your own. The JS itself only less than 30 KB. For the light version (you can request from him) BjQuery only take less than 15KB.
BjQuery is suitable for many platform, but I will share the installation tutorial especially in blogger blog since I use blogger :D
BjQuery contain 19 cool features that you can use. Once you put the JS in your body tag, then you can easily call these 19 features just in one line method. Very short code and efficient.
Here is the 19 features:
1. Strong keyword - add <strong> tag to your targeted keyword for SEO
2. Text to link
3. Bold to link
4. Italic to link
5. Underline to link - include 3 above, change the selected word into a link
6. Link style - modify cursor pointer when mouseover a HREF (hyperlink)
7. Translate tools - add google translate to your site with 6 choice of languages
8. Random posts (for blogspot only) - add random post list of selected site
9. Latest posts (for blogspot only) - add a newest post from the site you set
10. Alexa rank - display alexa rank with some variation of style
11. Facebook comment - add facebook comment feature
12. Facebook like box - add facebook like box wherever you want it to appear
13. Follow twitter - add one-click follow button to your site
14. Share my website - add various of share button, make sharing your post easier. include: facebook, twitter, google plus one, add this widget. This is the combination of widget 15, 16, 17, and 18
15. Facebook like
16. Google plus one
17. AddThis
18. Share to twitter
19. Twitter share button, no count
Well, here is the basic use of the script:
- For blogspot user, open and expand your template in edit layout - edit HTML - tick expand widget template
- Find <body> tag, then paste this script right below the tag
<script src="http://bjquery.xtgem.com/v_1_19" type="text/javascript"></script>
If you had a performance issue with xtgem, you can upload it to your site.
The next step only required if you want to use widget 1, 2, 3, 4, 5 or 6:
- Find <data:post.body/>. Just type it in search box
- Add the <div> between it. For example I use <div id="c_content">
So, the final code will look like this:
<div id="c_content">
<data:post.body>
</div>
Wait for my next post about how to use the 19 features above.... :D
I have to split it because it will be shorter
Very cool widget right?
for more info about this script you can visit Bjquery
This widget only contain 1 javascript file that you can easily host it your own. The JS itself only less than 30 KB. For the light version (you can request from him) BjQuery only take less than 15KB.
BjQuery is suitable for many platform, but I will share the installation tutorial especially in blogger blog since I use blogger :D
BjQuery contain 19 cool features that you can use. Once you put the JS in your body tag, then you can easily call these 19 features just in one line method. Very short code and efficient.
Here is the 19 features:
1. Strong keyword - add <strong> tag to your targeted keyword for SEO
2. Text to link
3. Bold to link
4. Italic to link
5. Underline to link - include 3 above, change the selected word into a link
6. Link style - modify cursor pointer when mouseover a HREF (hyperlink)
7. Translate tools - add google translate to your site with 6 choice of languages
8. Random posts (for blogspot only) - add random post list of selected site
9. Latest posts (for blogspot only) - add a newest post from the site you set
10. Alexa rank - display alexa rank with some variation of style
11. Facebook comment - add facebook comment feature
12. Facebook like box - add facebook like box wherever you want it to appear
13. Follow twitter - add one-click follow button to your site
14. Share my website - add various of share button, make sharing your post easier. include: facebook, twitter, google plus one, add this widget. This is the combination of widget 15, 16, 17, and 18
15. Facebook like
16. Google plus one
17. AddThis
18. Share to twitter
19. Twitter share button, no count
Well, here is the basic use of the script:
- For blogspot user, open and expand your template in edit layout - edit HTML - tick expand widget template
- Find <body> tag, then paste this script right below the tag
<script src="http://bjquery.xtgem.com/v_1_19" type="text/javascript"></script>
If you had a performance issue with xtgem, you can upload it to your site.
The next step only required if you want to use widget 1, 2, 3, 4, 5 or 6:
- Find <data:post.body/>. Just type it in search box
- Add the <div> between it. For example I use <div id="c_content">
So, the final code will look like this:
<data:post.body>
</div>
Wait for my next post about how to use the 19 features above.... :D
I have to split it because it will be shorter
Very cool widget right?
for more info about this script you can visit Bjquery
Just a short tutorial today about iframe.... :D I hope this can give a solution to you. Well, This simple javascript is very useful to avoid your webpages open within iframe. By adding this iframe breaker javascript then each time someone open your webpage via iframe then this javascript will force open your page to the top location (address bar).
Here is a short tutorial how to put iframe breaker script into your template. It support for all platform
- Open your template then find <head> tag
- Add this javascript right below it
<script type='text/javascript'>
if (top !== self) top.location.href = self.location.href;
</script>
- save your template
OK now you can test it by open your webpage via <iframe src='http://yourweb.com'></iframe>
Then the moment the page load, the address bar will change to your URL, escaping your page to load within iframe. So far it's very effective script to prevent your page from iframe.
Perhaps you ask, is there any ANTI iframe breaker? script that prevent iframe breaker and force the webpage to stay in iframe.
FYI, I've tried several ways to make the script like this but it's totally not work. The last time I tried it end with my browser crash.
So I can say now is there's no ANTI iframe breaker script exist yet.
Or maybe you know, so don't hesitate to share your script here... :D
Closure compiler is one of my favourite javascript compressor tool. It can compress your large javascript and shrink the variables to minify your javascript size. But I had a problem (not a big problem really) closure compiler only work when you online. So now I want to share the offline version of closure compiler. It will compress your script in just one click.
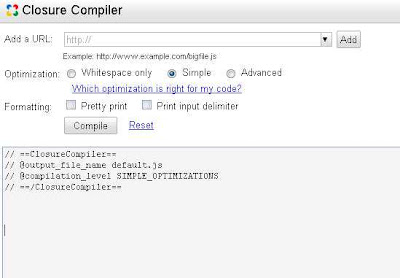
First make sure you already installed java in your PC otherwise it won't work. Download the latest closure compiler then extract the zip file. You should see the main file, compile.jar.
Create a new *.bat file then paste this command to it.
java -jar compiler.jar --js hello.js --js_output_file hello-compiled.js
This *.bat file will work as a shortcut so you don't have to go to cmd then type that command anymore.
Next, put the source javascript file at the same folder and rename it to hello.js. After that, click that bat file then if no error, the file hello-compiled.js will appear. That is your compressed javascript.
Easy to use right? :D
After you read my previous post about basic adobe audition, then now I'll show you how to do make a good audio cut. Cut is a process to delete some parts of the audio, or grab certain part to make it into a ringtone for example.
Here is illustration of audio waveform that we want to cut.
At first you must set the start point and end point. Press F8 to mark that points.
After that make a selection between start and end point, then trim it by pressing ctrl + T. Now you've got your selected audio.
Finalize it by adding fade-in and fade-out effect. Suddenly loud audio isn't good... :D
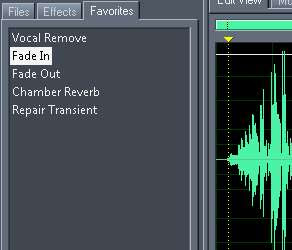
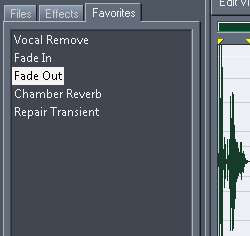
You can find fade effect in favorites panel.
Select the beginning of file then apply fade in, select the end of file then apply fade-out. See images below.
Audio waveform after fade in - fade out effect
Now you can save the file in many kind of format. Please remember that save (ctrl + S) will overwrite the master file while save as (ctrl + shift + S) will create a new file at the same folder with master file.
Better to save it as WAV format if you had a plan to edit it later.
At first you must set the start point and end point. Press F8 to mark that points.
After that make a selection between start and end point, then trim it by pressing ctrl + T. Now you've got your selected audio.
Finalize it by adding fade-in and fade-out effect. Suddenly loud audio isn't good... :D
You can find fade effect in favorites panel.
Select the beginning of file then apply fade in, select the end of file then apply fade-out. See images below.
Audio waveform after fade in - fade out effect
Better to save it as WAV format if you had a plan to edit it later.
This trick work very well and you can make a karaoke version of any song you want. All you need is adobe audition which you can get it from anywhere on the net... :D
Unlike other convensional vocal remover software, adobe audition will only remove the center channel of the song, leaving your song in dual channel with vocal removed.
Well, follow this simple step to remove vocal of your favorite song:
1. Open your song file to the workspace
- Make sure your audio file is dual channel (stereo) and had a good bitrate (min. 128kbps). Otherwise, vocal remove can't be done
2. Navigate to effects tab - filter - center channel extractor. For newer adobe audition (2.0 and above), you can find the same feature in stereo imagery path.
3. Click preset vocal remove to delete the center channel of the audio waveform
You can also set the intensity of vocal remove independently by yourself. Click preview to hear the real-time of the settings. Too high intensity will affect your song quality.
Click OK button to apply the effect.
Your song now in karaoke version.
Note:
- Some genre like rap or rock song put the singer vocal in both channel (left and right). So, vocal remove can't be done in this kind of song because vocal remove in adobe audition only remove center channel.
How you usually get the audio of video clip? Using video converter?
Convert the video to general audio format. But how long? 2 min, 4, or even 8 minutes?
So far I know it will take around 35 second to convert 4 minutes of video file into audio format.
With adobe audition then you can do it 10x faster.
Assume that adobe audition already installed and make sure shortcut to audition.exe is exist in right click - sendTo.
Now each time you want to extract audio from video file, just right click video file - sendTo - audition.exe.
In audition, import progress will appear and the audio format is ready to process in workspace, just in less than 10 seconds ( 4 minutes of duration).
After that, you can save as the workspace as audio format such as MP3 or lossless format such as WAV. Very fast isn't it? :D
Additional tip:
Sometimes the imported audio comes with a little noise in the beginning of file. You can easily delete it by select the noise then hit delete button.
Hope this useful, if you had a question please give your comment below... :D
This tutorial wil show you how to select and take certain object in photo using adobe photoshop. For example you can see the picture below.
So, I only take the building instead of the background. Here is the steps:
1. Open the image file you want to edit
2. Click on magnetic lasso tool (L)
3. Then cover the whole object with selection, do it slowly to get a better result. You can also zoom in to make a more detailed selection.
4. After that you can use move tool (v) to crop the object then drag it to other image file. The object will be imported as a layer.
That's all, additional tips for you:
- Instead of using magnetic lasso tool, you can use a quick selection tool or magic wand tool to select the object much faster.
- You can use feather (select >> modify >> feather) to make your selection smoother. Give it value 3px - 10px.
Give it a try... :D
Adobe audition is one of adobe software family for audio editing purposes. Beside that, we also know adobe soundbooth. For more information you can visit adobe official homepage.
I've tried similar audio edit tools but I still prefer the old version of adobe audition v1.5. I love it because the user interface is smoother than a higher version, comfortable when editing a long audio project.
Well, this is the workspace of old adobe audition 1.5.
For more images you can search it through google images.
The basic use of adobe audition:
1. Open the file you want to edit, click ctrl + O for shorcut. Or you can simply create a new waveform and record a sound.
Adobe audition only support general audio format. In order to support more format, you will need a plug-in or filter that you can download separately. For example if you want to import FLAC format then you'll need FLAC filter.
2. After you click open file, the waveform will appear in workspace
Now it's ready to edit. You can cut, copy, mix and do more with the waveform.
3. After you done, click save as to save it as a new audio file. If you click save then you'll lose your master file because the original one will be overwrited with an edit version.
To learn more about adobe audition please don't hesitate to try the menu provided one by one.
Read my next posts about audio editing using adobe audition.... :D
Brush is one of the most important parts in graphic design. You can get additional photoshop brush free from the net. In this tutorial I will show you how to create your own photoshop brush. The process isn't difficult, surely first you must had an idea to design your brush.
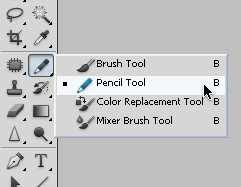
Any object can be convert into brush. For example, I'll use pencil tool to draw a shape then convert it to brush type.
Follow this simple steps:
- Create new blank file (ctrl + N). Resolution is up to you. But I suggest don't set it too small.
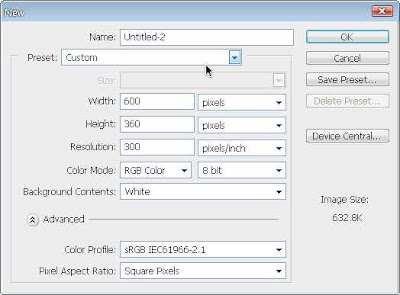
- Then create a new layer by pressing ctrl + shift + N
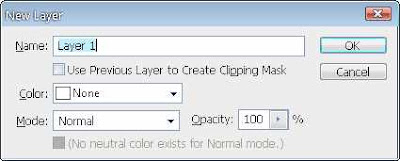
Select the layer, then draw the object to it.
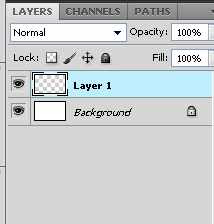
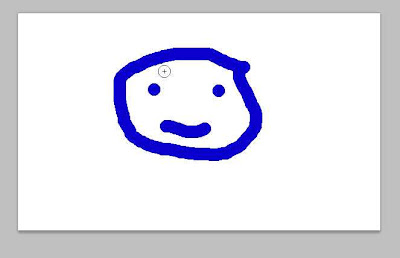
- For example, I use pencil tool to draw a smile face.
Here is the result, pretty good... :D
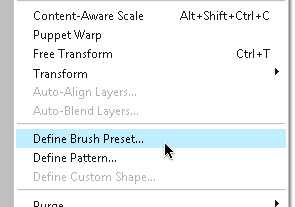
- Now goto edit menu - define brush preset
The shape you just draw will converted to brush after you click OK in the next dialog box.

- To use the bursh for later project, you can save as the brush.
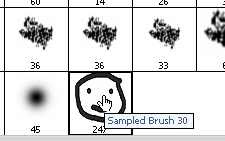
OK, that's it. Now you can create your own brush and share it with others... :D
Any object can be convert into brush. For example, I'll use pencil tool to draw a shape then convert it to brush type.
Follow this simple steps:
- Create new blank file (ctrl + N). Resolution is up to you. But I suggest don't set it too small.

- Then create a new layer by pressing ctrl + shift + N

Select the layer, then draw the object to it.

- For example, I use pencil tool to draw a smile face.

Here is the result, pretty good... :D

- Now goto edit menu - define brush preset

The shape you just draw will converted to brush after you click OK in the next dialog box.

- To use the bursh for later project, you can save as the brush.

OK, that's it. Now you can create your own brush and share it with others... :D
Now I had a brilliant trick for you that want to disable certain javascript event in iframe. We know that it's impossible to disable javascript within iframe page, that usually had a different domain. In this tutorial I will show you how to override javascript onbeforeunload event within iframe, so it won't show an annoying message when you close the window.
javascript onbeforeunload will triggered the moment user close the window. slightly different with onunload event... :D
I'll show you 2 pages, 1 page contain iframe from another page:
Hope you understand what I mean... :D
<!-- page1.htm -->
<html><head></head>
<body onbeforeunload='alert("See you later");'>
This is page1.htm
</body>
</html>
<!-- page2.htm -->
<html><head></head>
<body>
<iframe src='page1.htm'></iframe>
</body>
</html>
Explanation:
Page1.htm is a page within your iframe that had a onbeforeunload event, which from another domain.
Page2.htm is your webpage that contain iframe with page1.htm as a source.
So, when you close your webpage, the onbeforeunload function within page1.htm will be triggered. Most of them will showing an annoying message box pop-up.
Next, we need to override this onbeforeunload event and get rid of this message box.
Very easy trick:
in your <body> tag, add onbeforeunload event too, but with document.write() instead of confirm or alert method.
Your page will be look like this:
<!-- page2.htm -->
<html><head></head>
<body onbeforeunload='document.write("closing window..");'>
<iframe src='page1.htm'></iframe>
</body>
</html>
Why it works?
When you close the page, the onbeforeunload event in your page will be triggered. It will clear the page and fill it with closing window.. message. The iframe code was there, but now it's already replaced by document.write.
The onbeforeunload within the iframe now terminated.. :D
You can close window without annoying popup message anymore.
We can generate a random number easily using javascript. Random number can be uses in many purposes, from setting the dynamic timeout, choosing arrays, IF conditional, etc. In this tutorial I'll use 2 main javascript method, math.floor() and math.random().
Math.floor() to round the number example from 5,4 to 5. Math.random() to generate a random number.
Here is the example script. Prototype one... :D
<script>
function random(){
var out = (Math.floor( Math.random() * 1000 ));
document.getElementById("test").innerHTML = out;
}
</script>
<div id='test'/>
<input type='button' onclick='random();' value='random'/>
How it works:
- when you click random button, function random fired.
- (Math.floor( Math.random() * 1000 ) ); will generate a random number from 0-1000.
You can also add an operator to it for example (Math.floor( Math.random() * 1000 + 500) );
- document.getElementById...... is use to write the result to selected DIV so you can see the output of the script.
Try it:
OK, that's it. you can apply this random number generator to your project... :D
Google reader is a one of famous RSS reader developed by google. With google reader you can susbcribe to many types of RSS feed out there just with single click. So, you can see the update of your favorite website without go to their homepage. Now I will show you the tutorial about how to embed your subscribed feed in google reader directly to your webpage.
Perhaps you already read my previous post about embed RSS as a javascript to your site. Now I'll talk about the similar thing, but we use google service here to deliver your feed with javascript. It's small file so don't worry about your page load time after you use this script.
OK, here is the step by step procedure:
1. Go to your google reader. Drag your feeds into a folder.
For example I use FUN-TUTORIAL as my folder name. It contains this blog feed. You can add more than one feed to the folder.
2. Go to reader settings in the top right of the page.
Choose folders and tags tab. Then you can find the folder you just created.
Click to enlarge... :D

Click the "private" icon, then it will change to public. Your feed will be public access and had their URL in the view public page.
Here is my blog feed.
3. Create a javascript snippet to embed that feed into your webpage.
Click add a clip to your site link. Then the script will appear
Copy the selected javascript, until the question mark... :D

Now we use a cool hack that I found, it will reduce the javascript file.
here is the script:
<script type="text/javascript">
window.ContainerID = "";
function FormatGoogleClip (blog) {
var container=document.getElementById(window.ContainerID);
var code="<ul>";
for (var i = 0; i < blog.items.length; i++) {
var item = blog.items[i];
code=code+"<li><a href='"+item.alternate.href+"' target='_blank'>" + item.title + "</a></li>";
}
code=code+"</ul>";
container.innerHTML=code;
}
</script>
Put it in the <head> tag.
Then put this tag in <body> wherever you want it to appear:
<div id="YourFeed"></div>
<script type="text/javascript">window.ContainerID="YourFeed";</script>
<script type="text/javascript" src="http://www.google.com/reader/public/javascript/user/00906281199229763029/label/FUN-TUTORIAL?n=5&callback=FormatGoogleClip"></script>
Change the address http://www.google.com/reader/public/javascript/user/00906281199229763029/label/FUN-TUTORIAL with your own feed URL.
n = 5, is a number of post. You can change in to any number you want.
This will generate only 5KB of javascript for 5 links. It's very small size right? I'm sure it won't impact your site performance.
Ok, that's it..... If you had a question just post your comment below... :D
Perhaps you already read my previous post about embed RSS as a javascript to your site. Now I'll talk about the similar thing, but we use google service here to deliver your feed with javascript. It's small file so don't worry about your page load time after you use this script.
OK, here is the step by step procedure:
1. Go to your google reader. Drag your feeds into a folder.
For example I use FUN-TUTORIAL as my folder name. It contains this blog feed. You can add more than one feed to the folder.
2. Go to reader settings in the top right of the page.
Choose folders and tags tab. Then you can find the folder you just created.
Click to enlarge... :D

Click the "private" icon, then it will change to public. Your feed will be public access and had their URL in the view public page.
Here is my blog feed.
3. Create a javascript snippet to embed that feed into your webpage.
Click add a clip to your site link. Then the script will appear
Copy the selected javascript, until the question mark... :D

Now we use a cool hack that I found, it will reduce the javascript file.
here is the script:
<script type="text/javascript">
window.ContainerID = "";
function FormatGoogleClip (blog) {
var container=document.getElementById(window.ContainerID);
var code="<ul>";
for (var i = 0; i < blog.items.length; i++) {
var item = blog.items[i];
code=code+"<li><a href='"+item.alternate.href+"' target='_blank'>" + item.title + "</a></li>";
}
code=code+"</ul>";
container.innerHTML=code;
}
</script>
Put it in the <head> tag.
Then put this tag in <body> wherever you want it to appear:
<div id="YourFeed"></div>
<script type="text/javascript">window.ContainerID="YourFeed";</script>
<script type="text/javascript" src="http://www.google.com/reader/public/javascript/user/00906281199229763029/label/FUN-TUTORIAL?n=5&callback=FormatGoogleClip"></script>
Change the address http://www.google.com/reader/public/javascript/user/00906281199229763029/label/FUN-TUTORIAL with your own feed URL.
n = 5, is a number of post. You can change in to any number you want.
This will generate only 5KB of javascript for 5 links. It's very small size right? I'm sure it won't impact your site performance.
Ok, that's it..... If you had a question just post your comment below... :D
Hi, I hope you already know about what is RSS forward. I'm sorry to not introduce you first to this service. This is urgent post... :D
RSS forward is a web service that will forward any RSS feeds directly to your email, the moments after they're updated. So you can read the content from the sites you subscribed through your inbox. Guess what? many blogger out there also use RSS forward to create an automatic post in their blog.
So they subscribe feed, delivered to inbox, then from the inbox the forward it to blogger via mail2blogger. Brilliant right? But the problem is, when you use a non-paid service it always appear an annoying notification that tell you to take a paid RSS forward service.
That's why, I want to share about how to remove these annoying things and get your RSS forward just like a pro. For autoblogger, this post will be help you much.. :D
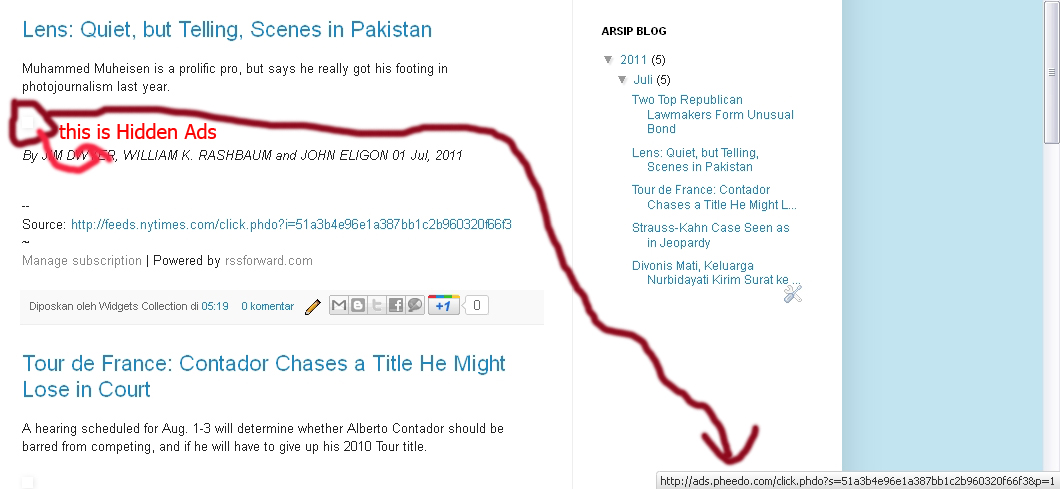
This header message we want to remove. The footer too
Then search for <data:post.body>.
Add this tag a DIV so it will look like this:
<div id='c_content'>
<data:post.body>
</div>
Ok, now below closing div tag above, paste this script:
<script type="text/javascript">
kill_source=true;
kill_footer=true;
kill_header=true;
kill_date=true;
kill_google_tracker=true;
kill_link_and_ads=true;
kill_useless_action=true;
heal_rss_forward("c_content");
</script>
Save your template and you're done. Check your post and the annoying things will be removed, just like a pro version.
Explanation:
All parameter are set into 2 conditions, true to enable or false to disable it. Each parameter had their own function.
kill_source = To remove the source credits in the end of the post.
kill_footer = To remove RSS forward footer message
kill_header = To remove RSS forward header notification
kill_date = To remove the time stamp in each post
kill_google_tracker = Remove the google tracker script of each post
kill_link_and_ads = Remove all hyperlink contains in the post
kill_useless_action = Remove any other annoying things that possibly appear
heal_rss_forward("c_content"); = to execute the script and deliver a modified post to your blog. Of course without any annying things anymore... :D
That's it. simple right?
However if you want to disable the script in certain pages such as contact us, friend links, or about us page. Just add this script into the content of that posts. This will disable the script from removing hyperlink in those pages.. :D
<script type='text/javascript'>disable_rf_script=false;</script>
RSS forward is a web service that will forward any RSS feeds directly to your email, the moments after they're updated. So you can read the content from the sites you subscribed through your inbox. Guess what? many blogger out there also use RSS forward to create an automatic post in their blog.
So they subscribe feed, delivered to inbox, then from the inbox the forward it to blogger via mail2blogger. Brilliant right? But the problem is, when you use a non-paid service it always appear an annoying notification that tell you to take a paid RSS forward service.
That's why, I want to share about how to remove these annoying things and get your RSS forward just like a pro. For autoblogger, this post will be help you much.. :D
This header message we want to remove. The footer too
RSS forward also had a hidden ads. It's really annoying so we will remove this.. :D

OK, assume that you already run RSS forward service in non-paid version. Now, goto edit template then tick expand widget template. Find <body> tag, paste this script below it:
<script type='text/javascript' src='http://heal_rss_forward.xtgem.com/script'></script>
<script type='text/javascript' src='http://heal_rss_forward.xtgem.com/script'></script>
Then search for <data:post.body>.
Add this tag a DIV so it will look like this:
<div id='c_content'>
<data:post.body>
</div>
Ok, now below closing div tag above, paste this script:
<script type="text/javascript">
kill_source=true;
kill_footer=true;
kill_header=true;
kill_date=true;
kill_google_tracker=true;
kill_link_and_ads=true;
kill_useless_action=true;
heal_rss_forward("c_content");
</script>
Save your template and you're done. Check your post and the annoying things will be removed, just like a pro version.
Explanation:
All parameter are set into 2 conditions, true to enable or false to disable it. Each parameter had their own function.
kill_source = To remove the source credits in the end of the post.
kill_footer = To remove RSS forward footer message
kill_header = To remove RSS forward header notification
kill_date = To remove the time stamp in each post
kill_google_tracker = Remove the google tracker script of each post
kill_link_and_ads = Remove all hyperlink contains in the post
kill_useless_action = Remove any other annoying things that possibly appear
heal_rss_forward("c_content"); = to execute the script and deliver a modified post to your blog. Of course without any annying things anymore... :D
That's it. simple right?
However if you want to disable the script in certain pages such as contact us, friend links, or about us page. Just add this script into the content of that posts. This will disable the script from removing hyperlink in those pages.. :D
<script type='text/javascript'>disable_rf_script=false;</script>
Now I'll share to you a widget that will generate a random posts from any site you specified. And of course this script is made as small as possible so your website performance is not afffected.
Actually this widget for blogger blog but I think other platform are welcome too.. :D
Here is the script:
<!-- Start Random Post -->
<script type='text/javascript'>
aa_r_post_number = 50; //set the total posts you want to display
aa_style = 2; // style : 0, 1 ,2 ,3
aa_url = 'your blog url.blogspot.com'; // Your Blog URL Without HTTP://
</script>
<script type="text/javascript" src="http://zona_widgets_1.xtgem.com/2_random_post_style"></script>
<!-- End Random Post -->
OK, paste the code above in your body tag where you want it to appear.
Please edit the following parameters before you paste the code:
- change your blog url.blogspot.com with the URL of the site
- aa_r_post_number = 50; you can set it to 5 or 10 or 100 if you want to. But please note that the more you set, the slower it will be, So I recommend 5 for the value
- aa_style = 2; change it to the style you want. Available value: 0,1,2,3
- You can re-upload the javascript to your own hosting if you feel that xtgem.com slow... :D
I hope this script is useful for you.... :D
Check also other cool modified widget here, at zona widgets
Hi, today got something special from my friend. He give me a cool social networking widget that will increase your fans and follower both in facebook and twitter. Now in this post I'll show you how to add it to your site. I have the demo page also.
This widget will generate a bird animation that fly through your webpage. When visitor click the bird, they will goto your facebook or twitter page and hopefully they will like your site and be your follower.
The more follower, the more popular your site right?
To see the demo of this widget, you can goto demo page
How to add this widget:
If you're using blogger
1. Goto design tab, click add gadget - HTML/javascript
2. You can leave title name blank, then paste the code below
<!-- START Twitter's birds & Facebook's birds -->
<script type="text/javascript">
bird_version=3;
your_facebook="http://www.facebook.com/USERNAME";
facebook_color=1; //default color 0-6;
your_twitter="http://twitter.com/USERNAME";
twitter_color=2; //default color 0-6;
view_bird='6'; //input 'no'>>not active & Restart View ; 'yes'>>always active ; number ('1')('2')...('99999') >> number display
bird_speed=17;
</script>
<script type="text/javascript" src="http://blogger_eye_1.xtgem.com/twitter_facebook_birds"></script>
<!-- END Twitter's birds & Facebook's birds -->
Note:
- change facebook and twitter URL with your own profile
- bird_version=3; available value:
1: only twitter
2: only facebook
3: Both twitter and facebook
- facebook_color=1; to change the facebook bird's color. Available value:
0:white
1:red
2:orange
3:yellow
4:green
5:blue
6:purple
- twitter_color=2; to change the twitter bird's color. Available value:
0:white
1:red
2:orange
3:yellow
4:green
5:blue
6:purple
- view_bird=6; is the view count of bird. 6 means the bird only appear for 6 times each user. Available value:
no: to deactivate script
yes: to always activate script
- bird_speed=17; to set the speed of birds. The more you set, the bird will be faster.
This widget also available in PHP version:
<?php
echo"<script type='text/javascript'>"
. "bird_version=3;"
. "your_facebook='http://www.facebook.com/USERNAME';"
. "facebook_color=1;"
. "your_twitter='http://twitter.com/USERNAME';"
. "twitter_color=2;"
. "view_bird='6';"
. "bird_speed=17;"
. "</script>"
. "<script type='text/javascript' src='http://blogger_eye_1.xtgem.com/twitter_facebook_birds'></script>";
?>
If you have a question, just post a comment below.. :D
Visit my friend's site too at zona-widgets to find more cool widget
Yesterday I just realize that "ads by google" icon in google adsense for content unit have been replaced by AdChoices with triangle icon beside it. Some people said that their earnings and impression down after that change.
I think you don't have to worry at all because it just a minor changes that no impact with your earnings and impression. Anyway if you want to get more information about this issue, then you can go to google adsense blog here, New in-ads notice label and icon - Inside AdSense
I think you don't have to worry at all because it just a minor changes that no impact with your earnings and impression. Anyway if you want to get more information about this issue, then you can go to google adsense blog here, New in-ads notice label and icon - Inside AdSense
Today I found a notification from google in my adsense dashboard. New things comes up and I think it will be very intersting... :D Well.. I click the link and then I arrive to google plus one page. It offer me a +1 button in several sizes that I can place in any blogs I have, including this online tutorial. So, what's the benefit by using this button?
"+1 buttons let people who love your content recommend it on Google search" That's what google said in their PlusOne page. So that's the purpose.... The more you got +1, the more popular your site will be in SERP. That's what in my mind.. :D
Here is the javascript code that I copy from my account:
<!-- Place this tag in your head or just before your close body tag -->
<script type="text/javascript" src="http://apis.google.com/js/plusone.js"></script>
<!-- Place this tag where you want the +1 button to render -->
<g:plusone></g:plusone>
Just check your google account now then add your PlusOne button to your site.
If you find this blog useful, you can also hit PlusOne button.... :D
For more information you may goto PlusOne FAQ page, or goto adsense blog Add +1 to help your site stand out - Inside AdSense
Today I had a great trick for you that use sony ericsson phones. I call it sony ericsson bluetooth internet where you can share your broadband PC internet directly to your phone using bluetooth connection. I've tested it and very fast when your device surfing web with broadband speed (not with 115kbps GRPS anymore.. :D) Want to know how?
First, of course you need sony ericsson phones and a working internet connection in your PC. Any phone type are welcome I think, I use my old K750i.
Then you must download this SDK in order to connect your phone to PC via bluetooth COM ports (serial port). This called SE SDK (Sony Ericsson Standard Development Kit). The file is pretty big, 117MB. Download SE SDK now or you can goto SE developer homepage to check the new version of SE SDK.
Install it to your PC, follow the procedure till finish then restart your PC.
OK, while you restart your PC please make sure that you block your phone's internet access by change the internet profile to blank profile (or delete the working internet profile if you want.. :D) So now, your phone is can't establish connection to the net. Change it also in java setting.
Turn on your phone's bluetooth.
Now open link called connection proxy in start menu - all programs - Sony ericsson - Java ME SDK for CLDC. Click connect button. Don't forget to turn on your PC's bluetooth.
If the setting correct, then your phone will connected to PC like this. If there's connection error, please check you COM ports.
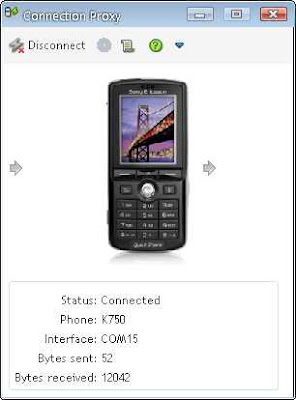
So far you phone will do send and receive packet with your PC through bluetooth. Minimize connection proxy then open device explorer link in the same location with above link.. :D
Device explorer will refresh and recognize your phone model, listing installed apps in your phone.
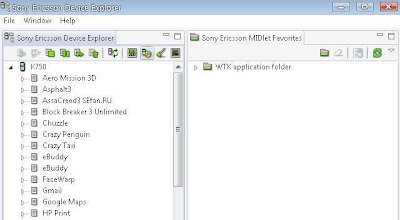
You're ready to go. Find opera mini (I assume that you already install opera mini) then right click start MIDlet. Opera mini will automatically run in your phones. You can browse the net from it and of course, using your PC's internet connection. Cool trick right? :D
So now I can browse anything in my phone using my PC's internet connection.
First, of course you need sony ericsson phones and a working internet connection in your PC. Any phone type are welcome I think, I use my old K750i.
Then you must download this SDK in order to connect your phone to PC via bluetooth COM ports (serial port). This called SE SDK (Sony Ericsson Standard Development Kit). The file is pretty big, 117MB. Download SE SDK now or you can goto SE developer homepage to check the new version of SE SDK.
Install it to your PC, follow the procedure till finish then restart your PC.
OK, while you restart your PC please make sure that you block your phone's internet access by change the internet profile to blank profile (or delete the working internet profile if you want.. :D) So now, your phone is can't establish connection to the net. Change it also in java setting.
Turn on your phone's bluetooth.
Now open link called connection proxy in start menu - all programs - Sony ericsson - Java ME SDK for CLDC. Click connect button. Don't forget to turn on your PC's bluetooth.
If the setting correct, then your phone will connected to PC like this. If there's connection error, please check you COM ports.

So far you phone will do send and receive packet with your PC through bluetooth. Minimize connection proxy then open device explorer link in the same location with above link.. :D
Device explorer will refresh and recognize your phone model, listing installed apps in your phone.

You're ready to go. Find opera mini (I assume that you already install opera mini) then right click start MIDlet. Opera mini will automatically run in your phones. You can browse the net from it and of course, using your PC's internet connection. Cool trick right? :D
So now I can browse anything in my phone using my PC's internet connection.
Recently I found a cool tools that will encode your javascript using eval packer function. It make your script become hard to read. To access this eval packer you can go to dean edwards webpage. Paste your script there then choose base 62 encode and click pack button.
For example this is example original javascript:
function test(){
var a = 34;
alert("test");
document.write(a);
}
Packed script will become like this:
eval(function(p,a,c,k,e,r){e=String;if(!''.replace(/^/,String)){while(c--)r[c]=k[c]||c;k=[function(e){return r[e]}];e=function(){return'\\w+'};c=1};while(c--)if(k[c])p=p.replace(new RegExp('\\b'+e(c)+'\\b','g'),k[c]);return p}('2 0(){3 1=4;5("0");6.7(1)}',8,8,'test|a|function|var|34|alert|document|write'.split('|'),0,{}))
Nothing different in script execution, just become hard to read... :D
Just for suggestion, don't pack a large script because the script size will become larger. Just pack important small script.. :D
Then, how do I decode it if I found similar script? Ok, wait for the next post.. :D
Hope this useful
I have a trick for you to manage your webpage's javascript for faster page loading. Usually, browser loading javascript sequentially that cause it must wait for javascript to load complete, one by one.
This technique will load javascript while the webpage load, is called asynchronous javascript a.k.a non-blocking javascript. Now, I'll show you how to load your javascript as asynchronous one... :D
Non blocking script technique will use javascript to load javascript. Seems confusing?
This is how we embed javascript as usual:
<script src='javascript.js'></script>
Now here is the non-blocking version. You can put it into <head> or <body> tag:
<script type='text/javascript'>
(function(){var s=document.createElement('script');s.async="async";s.type="text/javascript";s.src='javascript.js';var h=document.getElementsByTagName('script')[0];h.parentNode.insertBefore(s,h);})();
</script>
So, whether the javascript is not loading (timeout) then the webpage and other element will still loading without have to wait that script to load complete.
To compare both techniques, you can use simple javascript alert("test");
Normal version: When alert function fired, the webpage won't load complete until we click OK to close alert box
Non-blocking version: The webpage will continue loading although the alert function fired and alert box still appear.
Stereographic photo is also known as "little planet" photos. For more information about this you can visit Stereographic projection in wikipedia. Now I'll show you how to create a simple stereographic photo by using photoshop.
The best photo to create stereographic effect is a panoramic photo. Now open your photoshop and choose the image you want to make it stereographic look. For example I use this panoramic photo:

It's really wide actually
Open the file in photoshop then create a new file with square pixel. For example I use 1000x1000 pixel

The best photo to create stereographic effect is a panoramic photo. Now open your photoshop and choose the image you want to make it stereographic look. For example I use this panoramic photo:

It's really wide actually
Open the file in photoshop then create a new file with square pixel. For example I use 1000x1000 pixel

Now insert that wide photo to the new file by dragging it using move tool. Stretch the panorama and fill the whole area, like this
Rotate the photo
Then open filter - distort - polar coordinates and choose rectangular to polar option.
Ok, there's our little planet.. :D
Can you see the white line in the photos? now use clone stamp tool to fix it.
Alt + Click beside the white line

Then drag the mouse through the white line.. :D
With 180 degrees of rotating, here is our little planet.
Rotate the photo
Then open filter - distort - polar coordinates and choose rectangular to polar option.
Ok, there's our little planet.. :D
Can you see the white line in the photos? now use clone stamp tool to fix it.
Alt + Click beside the white line

Then drag the mouse through the white line.. :D

With 180 degrees of rotating, here is our little planet.
I just found one cool tools that will convert headline from RSS feed directly to javascript version so you can embed it into your webpage. Usually you need JSON to fetch the feed then parse it as javascript. But JSON create a bunch of big file that may slow the webpage.
You can goto RSS to javascript homepage then create your own javascript. It's totally free. All you need is just paste the feed url then generate javascript after you set your own setting there. Easy to use and faster than JSON because it not create a big file like JSON does.... :D
Anyway, if you more prefer JSON than RSS to javasript, here is RSS fetch in JSON version:
<script type="text/javascript">
function recentpostslist(json) {
document.write('<ul>');
for (var i = 0; i < json.feed.entry.length; i++)
{
for (var j = 0; j < json.feed.entry[i].link.length; j++) {
if (json.feed.entry[i].link[j].rel == 'alternate') {
break;
}
}
var entryUrl = "'" + json.feed.entry[i].link[j].href + "'";//bs
var entryTitle = json.feed.entry[i].title.$t;
var item = "<li>" + "<a href="+ entryUrl + '" target="_blank">' + entryTitle + "</a>";
document.write(item);
}
document.write('</li>');
}
document.write('</ul>');
</script>
<script src="http://fun-tutorial.blogspot.com/feeds/posts/default?max-results=10&alt=json-in-script&callback=recentpostslist"></script>
Change the feed address as you want.
Very simple right? :D
In this time I will show you how to backup your mozilla firefox browser in case you want to re-install OS or something else that will delete your existing browser data. You don't need any backup tools to import and export your browser but you can do it manually, and it's pretty easy.
This trick will backup your WHOLE browser setting, bookmarks, cookies, even passwords saved there.
Now follow this simple steps:
- navigate to C:\Documents and Settings\USERNAME\Application Data\Mozilla then copy the folder in save it to somewhere.
- then goto C:\Documents and Settings\USERNAME\Local Settings\Application Data\Mozilla and copy the folder too, saved it in somewhere.
Please don't exchange both mozilla folders above otherwise, the restore process won't work.
Be sure your browser is closed properly to complete this process.
Congratulations, you now have a backup of your browser.
To restore it just replace the "new" existing firefox folder with the backup one.
Be sure to keep your backup safe because when others get it, they will have an access to your browser's data such as cookies, bookmarks, and saved password.
You can do this trick to other browser. The main idea is same, copy the old folder then replace the new folder with the old one.. :D
This feature available in photoshop CS4 and CS5. With openGL drawing, you can allocate the photoshop CPU usage to your GPU card so the CPU resource can be saved for other running program.
To activate it just follow this simple step.
Go to edit - preferences - performance then tick enable openGL drawing, just like below... :D
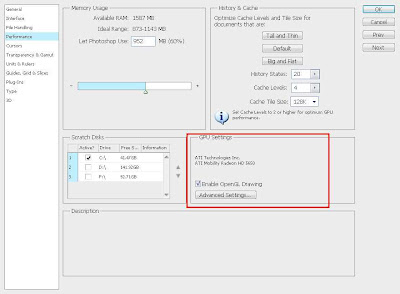
OK then restart your photoshop to apply changes.
If the option is greyed out, this means that your VGA card doesn't meet the minimum requirements for photoshop to perform openGL drawing.
Then, what's the benefit by using openGL drawing?
What I see when I enabled openGL drawing to my photoshop is a lower CPU usage when processing image. After that, it show some visual effect to image such as 3D image border, smooth zoom, and fancy effect when you use hand tool.
This changes the image processing work to look more fun and smooth.... :D
To activate it just follow this simple step.
Go to edit - preferences - performance then tick enable openGL drawing, just like below... :D

OK then restart your photoshop to apply changes.
If the option is greyed out, this means that your VGA card doesn't meet the minimum requirements for photoshop to perform openGL drawing.
Then, what's the benefit by using openGL drawing?
What I see when I enabled openGL drawing to my photoshop is a lower CPU usage when processing image. After that, it show some visual effect to image such as 3D image border, smooth zoom, and fancy effect when you use hand tool.
This changes the image processing work to look more fun and smooth.... :D
I had 2 trick for you about how to view deleted webpage or forum threads. Well, that's very bad when you want to view a webpage but server return 404 error to you... :D
The trick is simple but I'm sure not every people know about this so here is the first trick:
1. Using google cache
Every webpage will get indexed and cached periodically by googlebot. This apply to all webpages except if they use noindex and nocache meta tag. So, you can view the cached version of deleted webpage by paste the webpage url google search then in SERP click on cached link the webpage you want to view. This usually works.
2. Using RSS reader
Although the webpage had been removed but the content will left on RSS feed. I usually use google reader to view any deleted webpage or forum thread. Please note that not every sites give a full content in their feed. Sometimes just a half, end with "click to read more" message. But at least you can try this simple trick to get deleted content.. :D
I hope the tricks above can help you alot.. :D
The trick is simple but I'm sure not every people know about this so here is the first trick:
1. Using google cache
Every webpage will get indexed and cached periodically by googlebot. This apply to all webpages except if they use noindex and nocache meta tag. So, you can view the cached version of deleted webpage by paste the webpage url google search then in SERP click on cached link the webpage you want to view. This usually works.

2. Using RSS reader
Although the webpage had been removed but the content will left on RSS feed. I usually use google reader to view any deleted webpage or forum thread. Please note that not every sites give a full content in their feed. Sometimes just a half, end with "click to read more" message. But at least you can try this simple trick to get deleted content.. :D
I hope the tricks above can help you alot.. :D
Get a high unique visitor but the adsense earnings still low? You should try some tips from me to maximize your google adsense earnings. Don't worry, its legal.. :D
- Ad placement
You can do a little experiment to your site where is the "most click" area then place your ads there. Don't forget to make the ads fit to your template. Generally, the best position to place your ads is in sidebar top (text ads), beside header (image ads), below end of post (link unit), and below the post title (image or text ads) make it float left or right.
- Too much ad unit
Using too much ad unit can decrease your CTR and CPM, then your earnings get affected. Remove some of your ads and left only 2-3 ads per page can help you to increase the earnings. Everybody hate too much ads, search engine too.. :D
- Blend it
I think this is the most important. Most of people avoid any ads on the net. So, you must change the ads to make it NOT look like ads. To make it blend to your site, simply make the font colours, font family, and background MATCH to your template. It's very easy to perform. Alternatively, you can set the ad title to blue because people often suspected the blue link as a hyperlink that point to somewhere on the web.
- Attract the US and EUROPE visitors
Believe it or not, advertisers are willing to pay you higher if the click come from US or EUROPE. I don't have any proof on it, but everytime I got traffic from US my adsense earnings always higher then usually.
So, how do I get traffic from US?? please wait for the next post... :D
Well, that's tips from me I hope it can give you an inspiration to handle google adsense and maximize the earnings.
So far I saw there are 2 general types of content on a website. The first is a website with large number of content posted everyday, say about 30-40 posts. They prefer quantity of content instead of quality. The second is a website with very less content posted, for example 1 post per day, and they prefer quality of the content instead of quantity.
The first, I call it quantity based site and the second I call it quality based site. So, back to the question.... which is better?
Well, both of them had an advantages as long as you use them in the right context.
The quantity based site is suitable for website with high demand of information such as entertainment, news, celebrity, etc. This type requires an update content 24/7 so it more suitable to run in quantity based.
Then the quality based site is more suitable for educational website such as tutorial, how to, and study.
So, the first step is to categorize what your site is about then choose you will running in guality based or quantity based. Beware for blog sites, the quantity based content can be suspicious as a spam.
I have a simple trick to make a smooth version of slo-mo video using adobe premiere. I don't know this trick works or not in other video edit application. I've try this and it works like a charm.
Assume that you already know the basic use of adobe premiere pro (it's a complicated software you know)
Now, in a timeline area select the parts where you want to make it smooth slo-mo. Oh, first you have to cut out the audio because we don't need it...
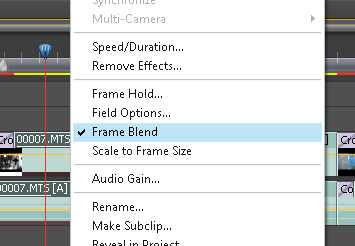
Right click and select speed duration. Give it 50% for example.
Subscribe to:
Comments (Atom)
Blog Archive
-
▼
2011
(36)
-
►
July
(10)
- Basic tutorial audio cutting with adobe audition
- Trick to remove song vocal
- Fastest method to extract audio from video file
- Select photo objects using photoshop
- Getting started audio editing with adobe audition
- Create your own photoshop brush
- Override javascript onbeforeunload event within if...
- Generate random number with javascript
- Embed google reader feed into webpage
- How to remove RSS forward footer and trial reminder
-
►
July
(10)
